Booking a bus ticket with the TmoneyGO app
TmoneyGO (티머니GO) is the app that sells the express and intercity bus tickets used in this guide — including the airport buses from Daejeon to Incheon Airport (ICN) and from Yuseong to Cheongju Airport (CJJ). Buying in the app is the most reliable way to secure a seat, because the early-morning airport buses are often sold out on the day of travel.
This page is written for a foreigner who holds a Korean credit or check (debit) card. The app has no English interface, so every screen below is annotated: the red box shows what to tap, and the Korean words you need are spelled out.
The app registers only cards issued in Korea and in your own name. A card issued outside Korea will not register, and some Korean cards are blocked by their issuer. If you do not have a Korean card, ask your host at IBS to buy the ticket for you and send you the QR-code ticket, or buy your ticket at the machine in the bus stop.
You need to install TmoneyGO (iOS · Android) and sign in before you start. Signing up requires a Korean mobile phone number for the identity check, so do this while you still have your Korean SIM.
- The Korean words you will need
- Step 1 — Open the app and choose 공항버스 (Airport bus)
- Step 2 — Close the pop-up notice
- Step 3 — Set 출발지, where you get on
- Step 4 — Set 도착지, where you get off
- Step 5 — Pick the date and the earliest hour
- Step 6 — Check the card and tap 버스 조회 (Search buses)
- Step 7 — Dismiss the operator notice
- Step 8 — Choose your departure
- Step 9 — Pick your seat
- Step 10 — Check the reservation and tap 결제하기 (Pay)
- Step 11 — Choose 신용/체크 등록 간편결제 as the payment method
- Step 12 — Register your card
- After paying — finding and reading your ticket
- Changing or cancelling a ticket
- If something goes wrong
The Korean words you will need
Every button in this guide is one of these. You do not have to read Korean — just match the shapes.
And these are the stop names you will be looking for in the lists:
Check which terminal your flight leaves from before you book. Terminal 1 and Terminal 2 at Incheon are 15 km apart and the buses go to one or the other.
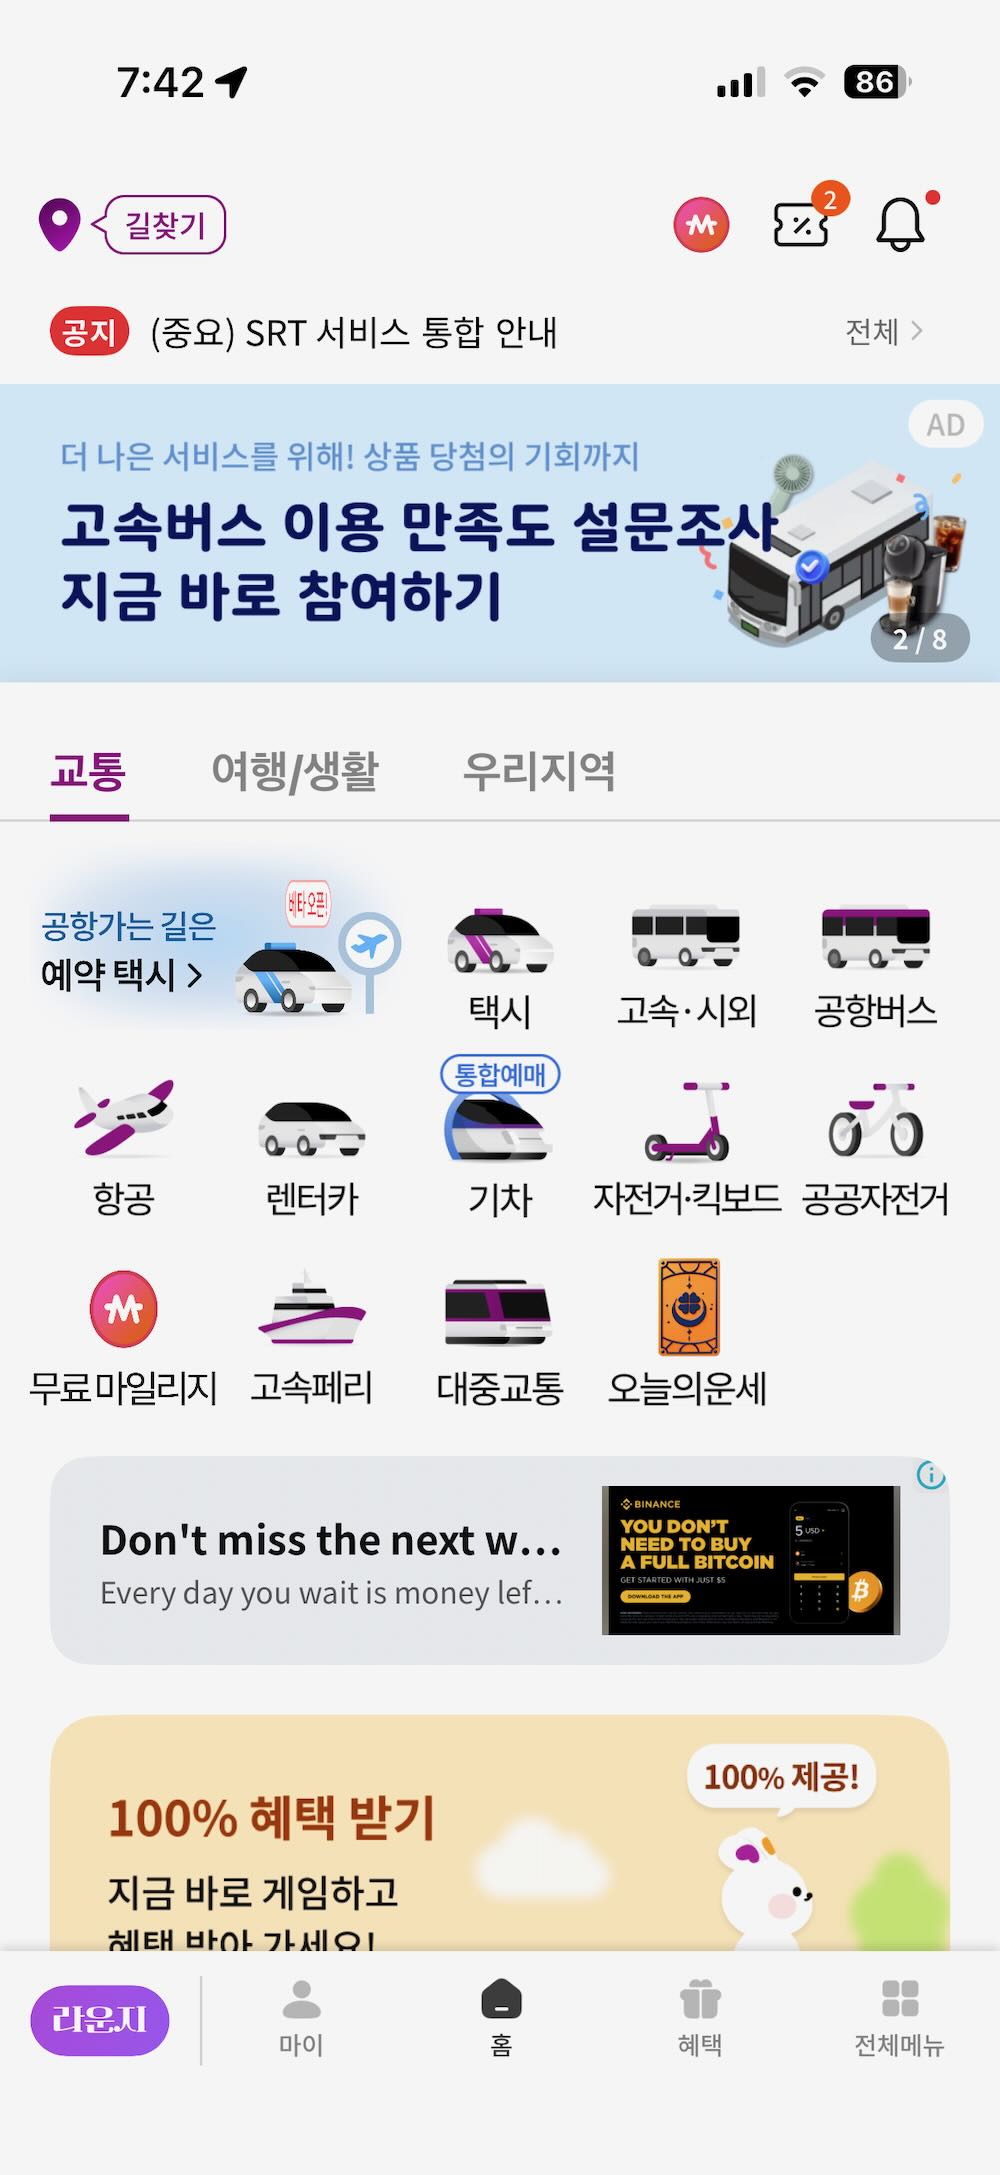
Step 1 — Open the app and choose 공항버스 (Airport bus)
On the home screen, stay on the first tab 교통 (Transport) and tap 공항버스 — the third icon in the top row, the one with a purple bus.
Going somewhere that is not an airport (Seoul, Busan…)? Tap 고속·시외 instead, the icon to its left. Everything after this step works the same way.
 1
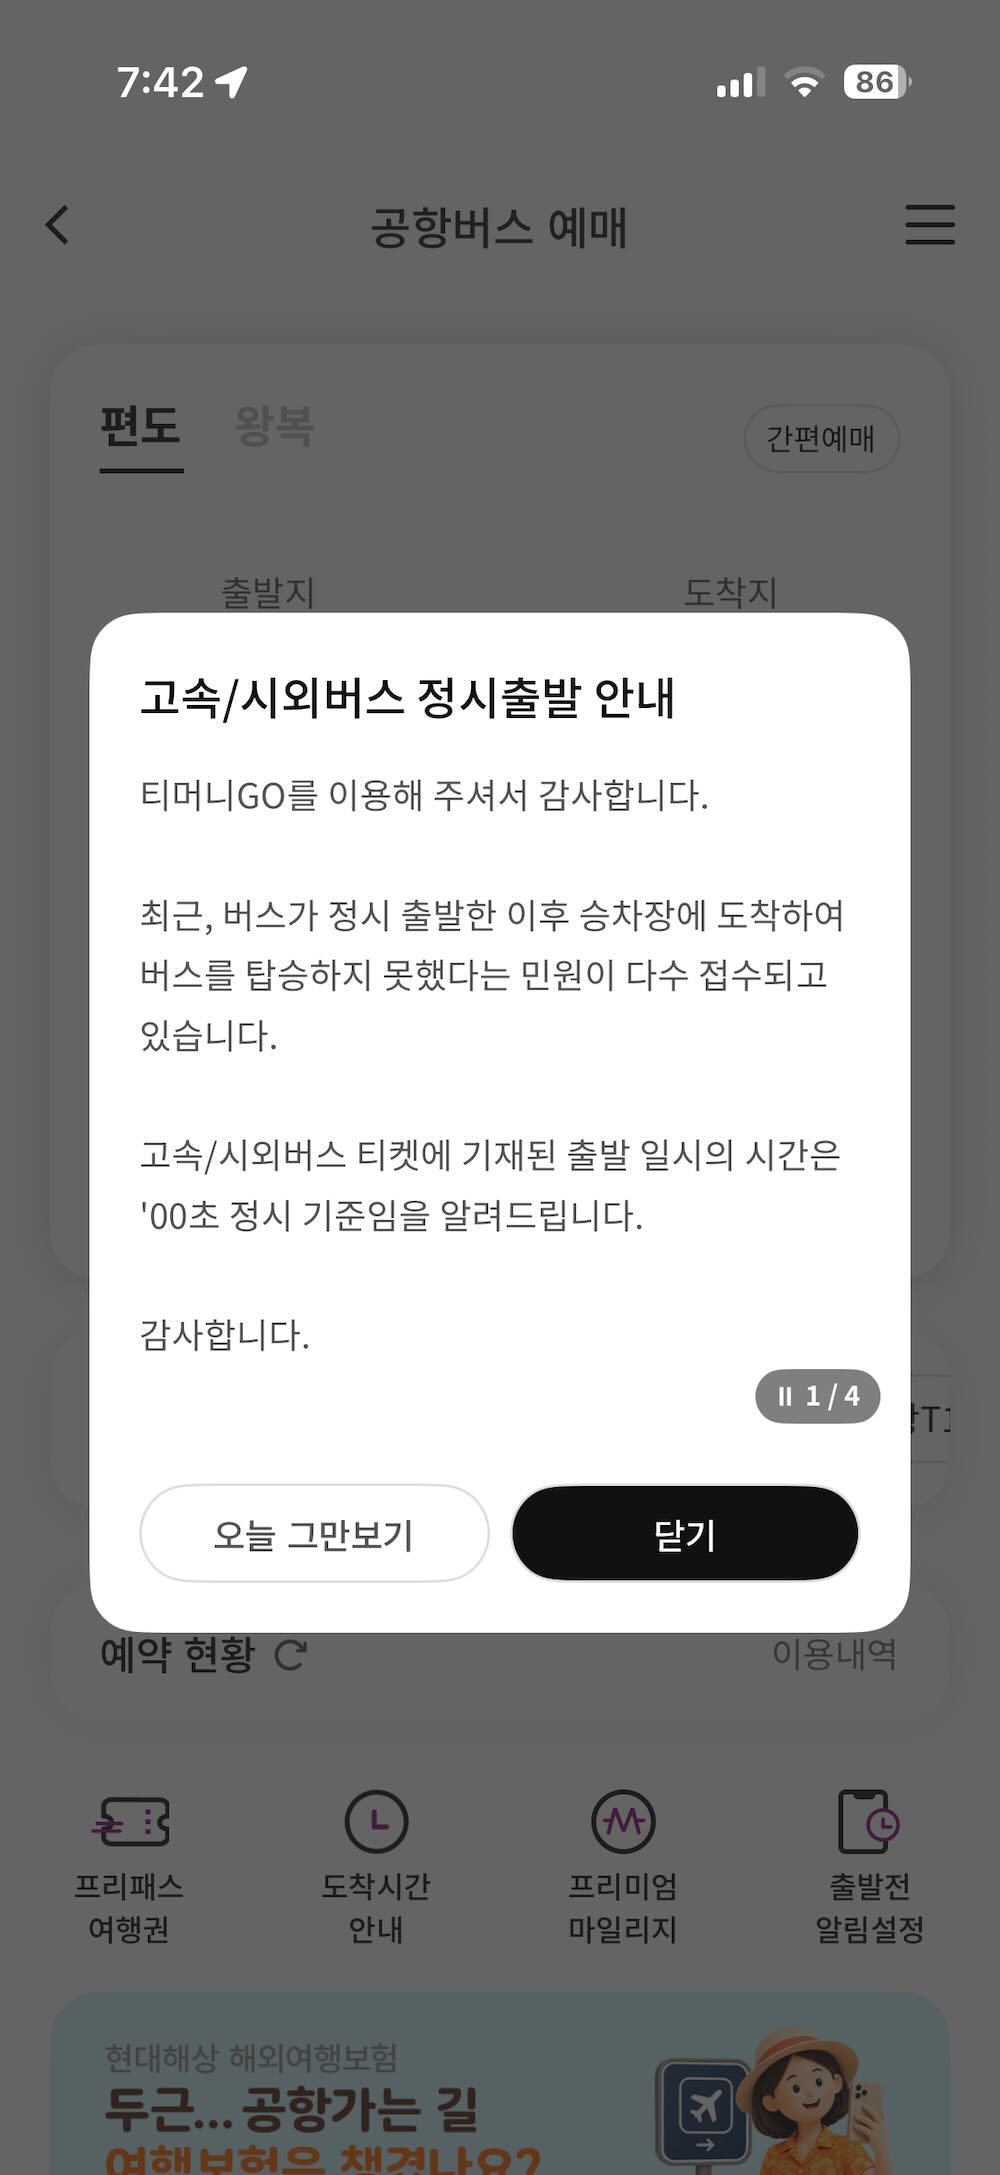
1Step 2 — Close the pop-up notice
The app opens with an advertisement or a notice. Tap the black 닫기 (Close) button. The white button next to it, 오늘 그만보기, means “don’t show this again today” and works just as well.
 1
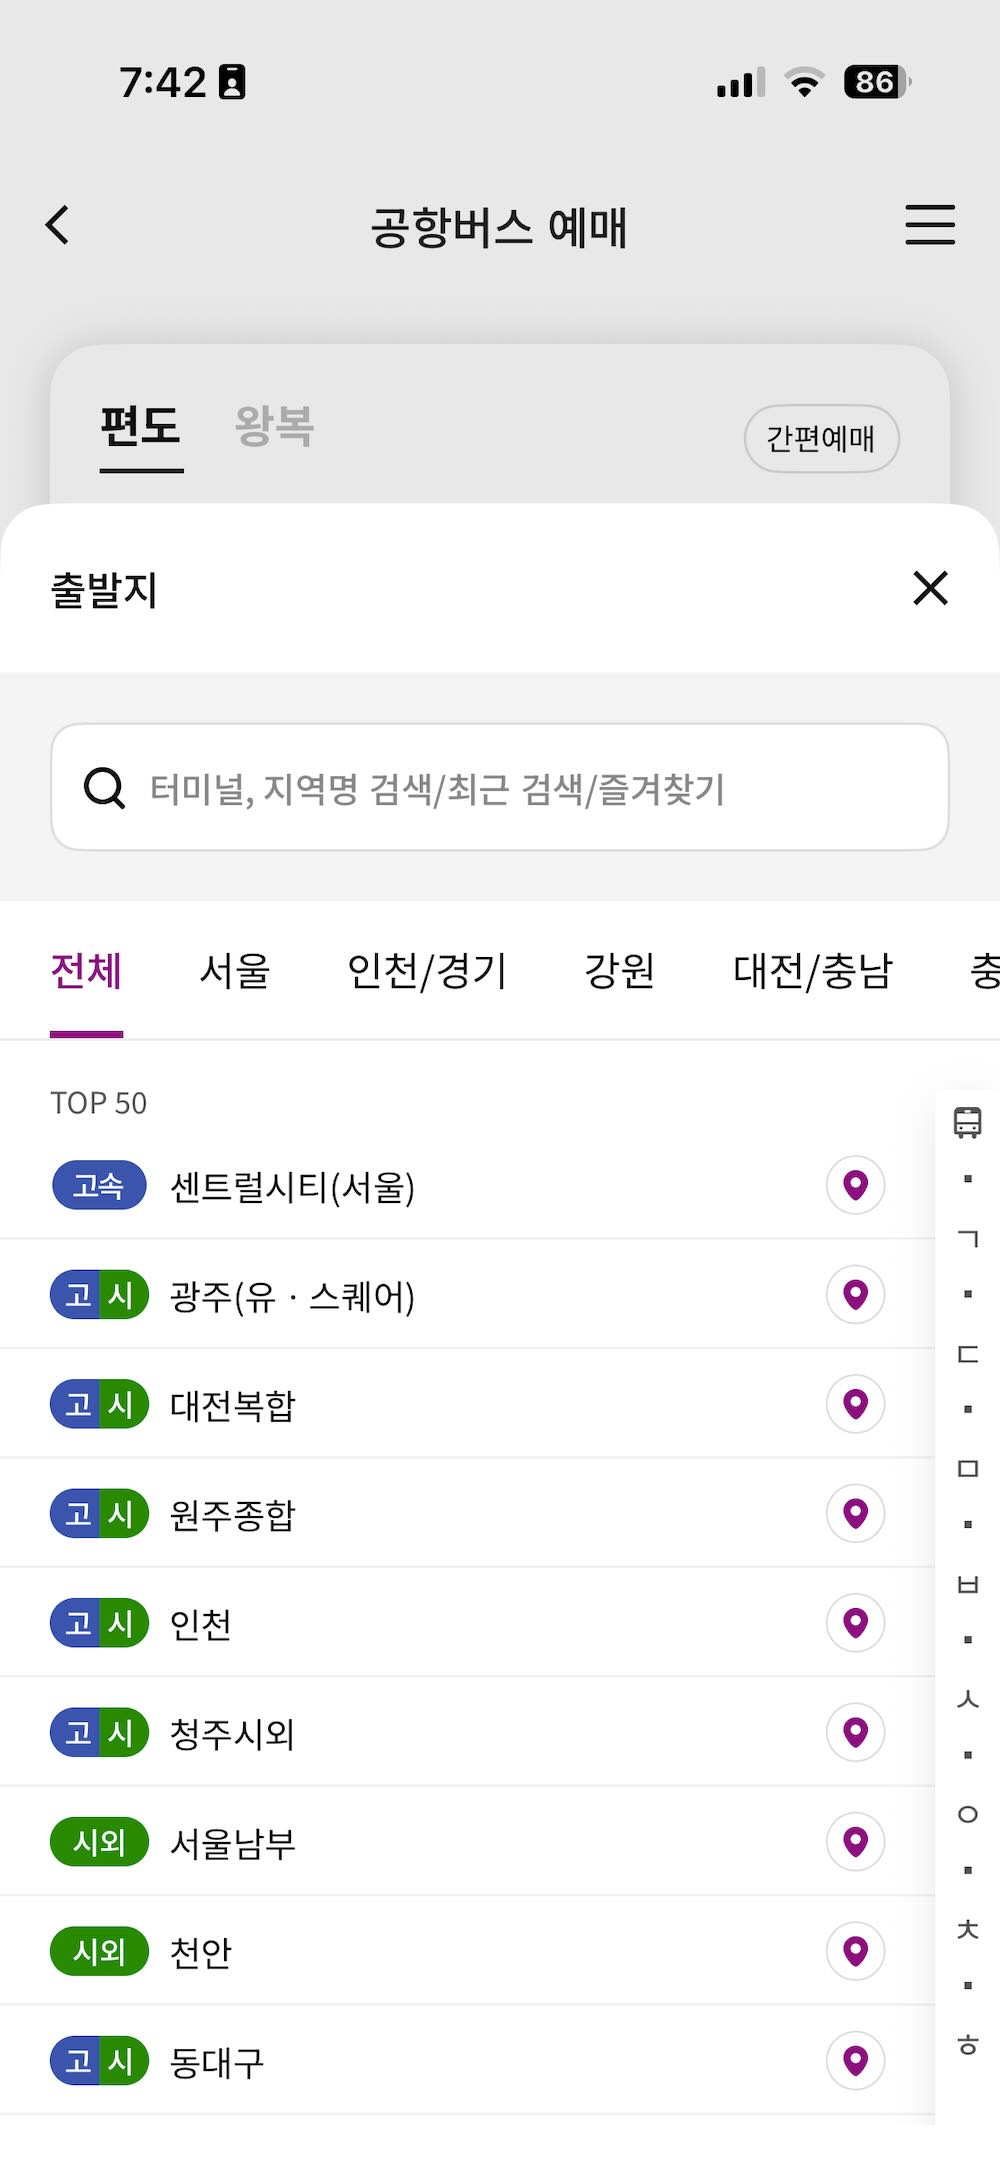
1Step 3 — Set 출발지, where you get on
Tap 출발지 (Departure point) on the booking card. A list of terminals slides up. The quickest way to find your stop is the region tabs: tap 대전/충남 (Daejeon / South Chungcheong), then scroll the list until the Korean name matches the one you are looking for.
 12
12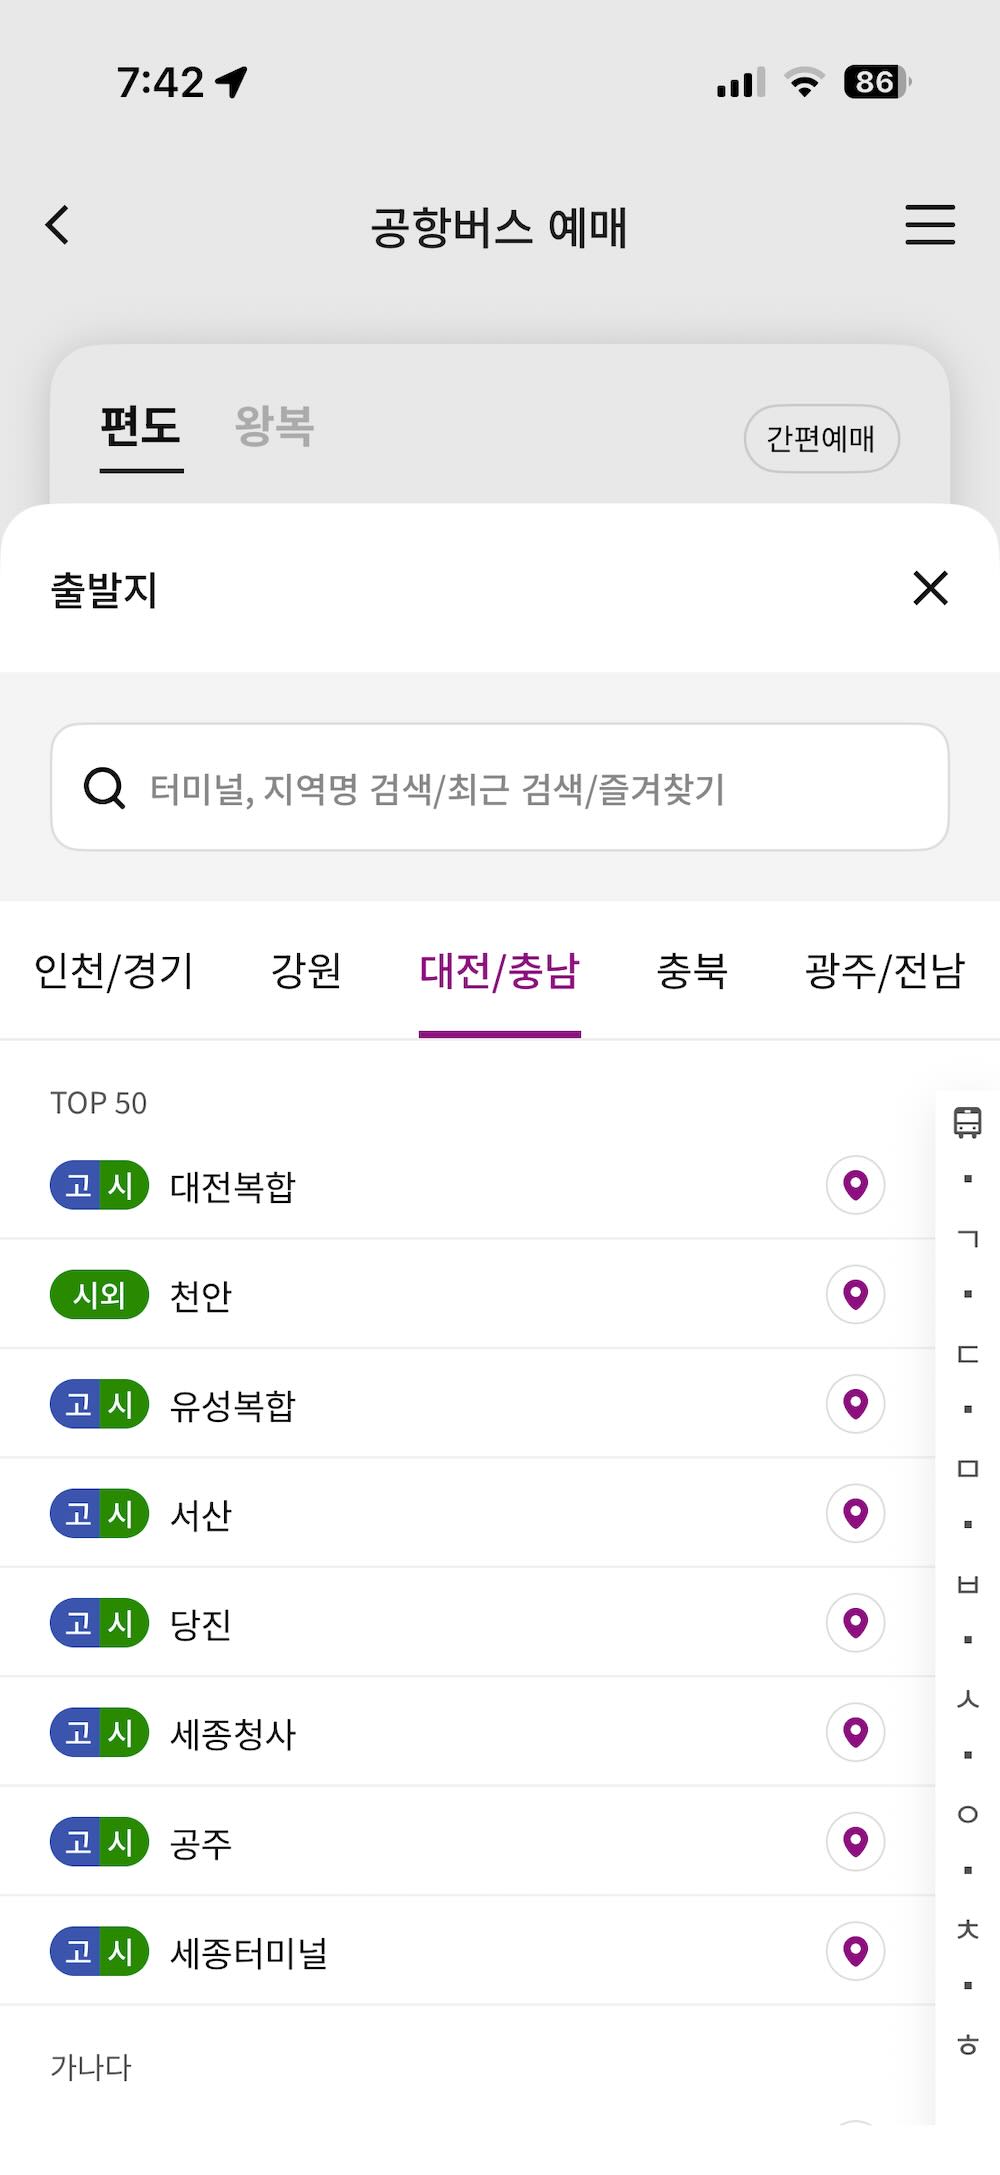 1
1The list starts with a TOP 50 block and then repeats everything alphabetically under 가나다. Rather than scrolling, use the grey strip of letters down the right edge — it is a Korean alphabetical index. 대전도룡 and 대전복합 start with ㄷ, so tap that letter and the list jumps straight to them. (유성복합 is under ㅇ.)
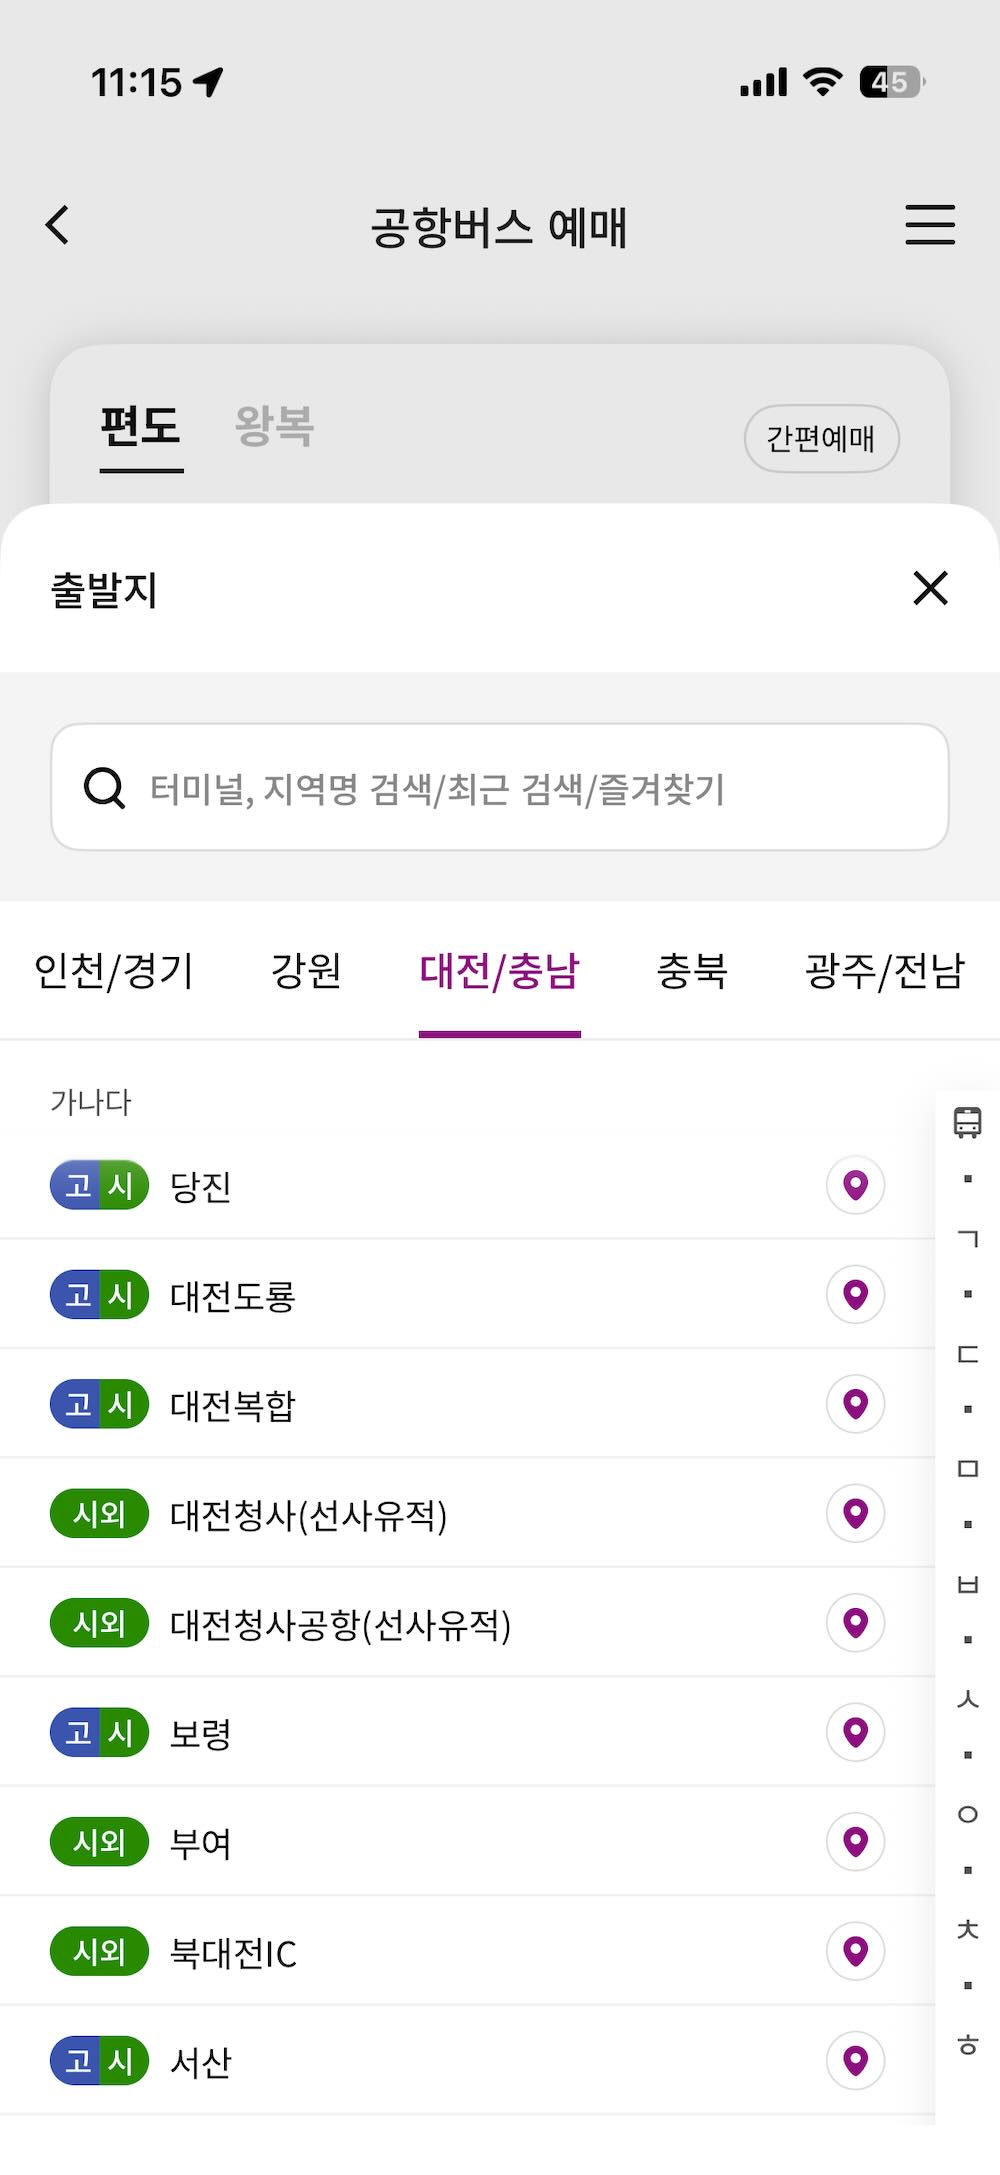 12
12Do not confuse it with the names just below: 대전복합 is the big terminal by Daejeon Station, and 대전청사 / 대전청사공항(선사유적) are the Government Complex stops. The one nearest IBS is 대전도룡.
Step 4 — Set 도착지, where you get off
Now tap 도착지 (Destination). For the airport bus the list is short, because it only shows airports. Pick 인천공항T1 or 인천공항T2 according to your flight — or 청주공항 for Cheongju.
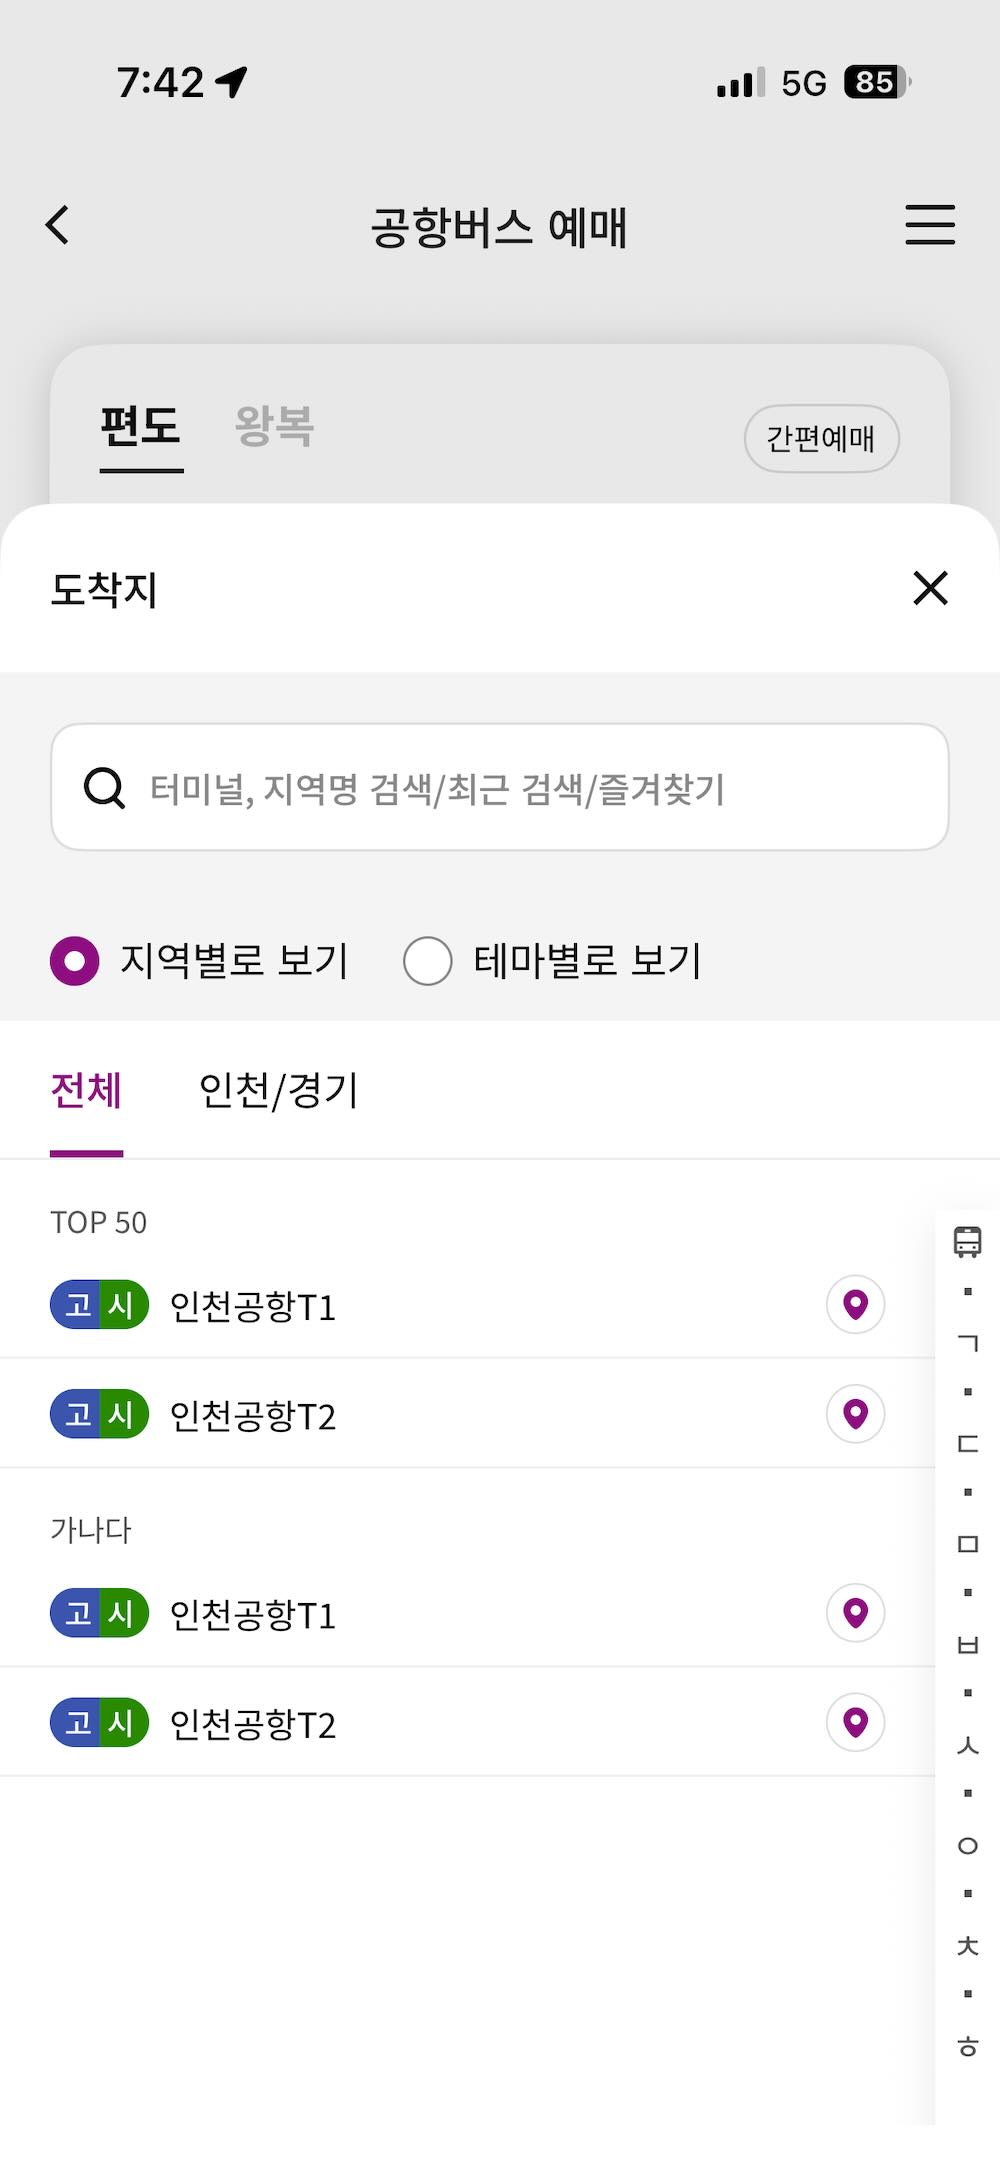 12
12Step 5 — Pick the date and the earliest hour
Tap 가는날 (Date of travel). Choose the day from the calendar, then choose the earliest departure hour you want to see from the row of chips below — 07시 means “07:00 and later”. Grey chips are hours that have already passed. Finish with the black 선택완료 button.
The airport buses to Incheon start running around 03:00. A bus that leaves at 03:14 leaves on the calendar day of your flight, not the evening before — pick the date carefully, and set the hour chip to 00시 so that the night departures are not hidden.
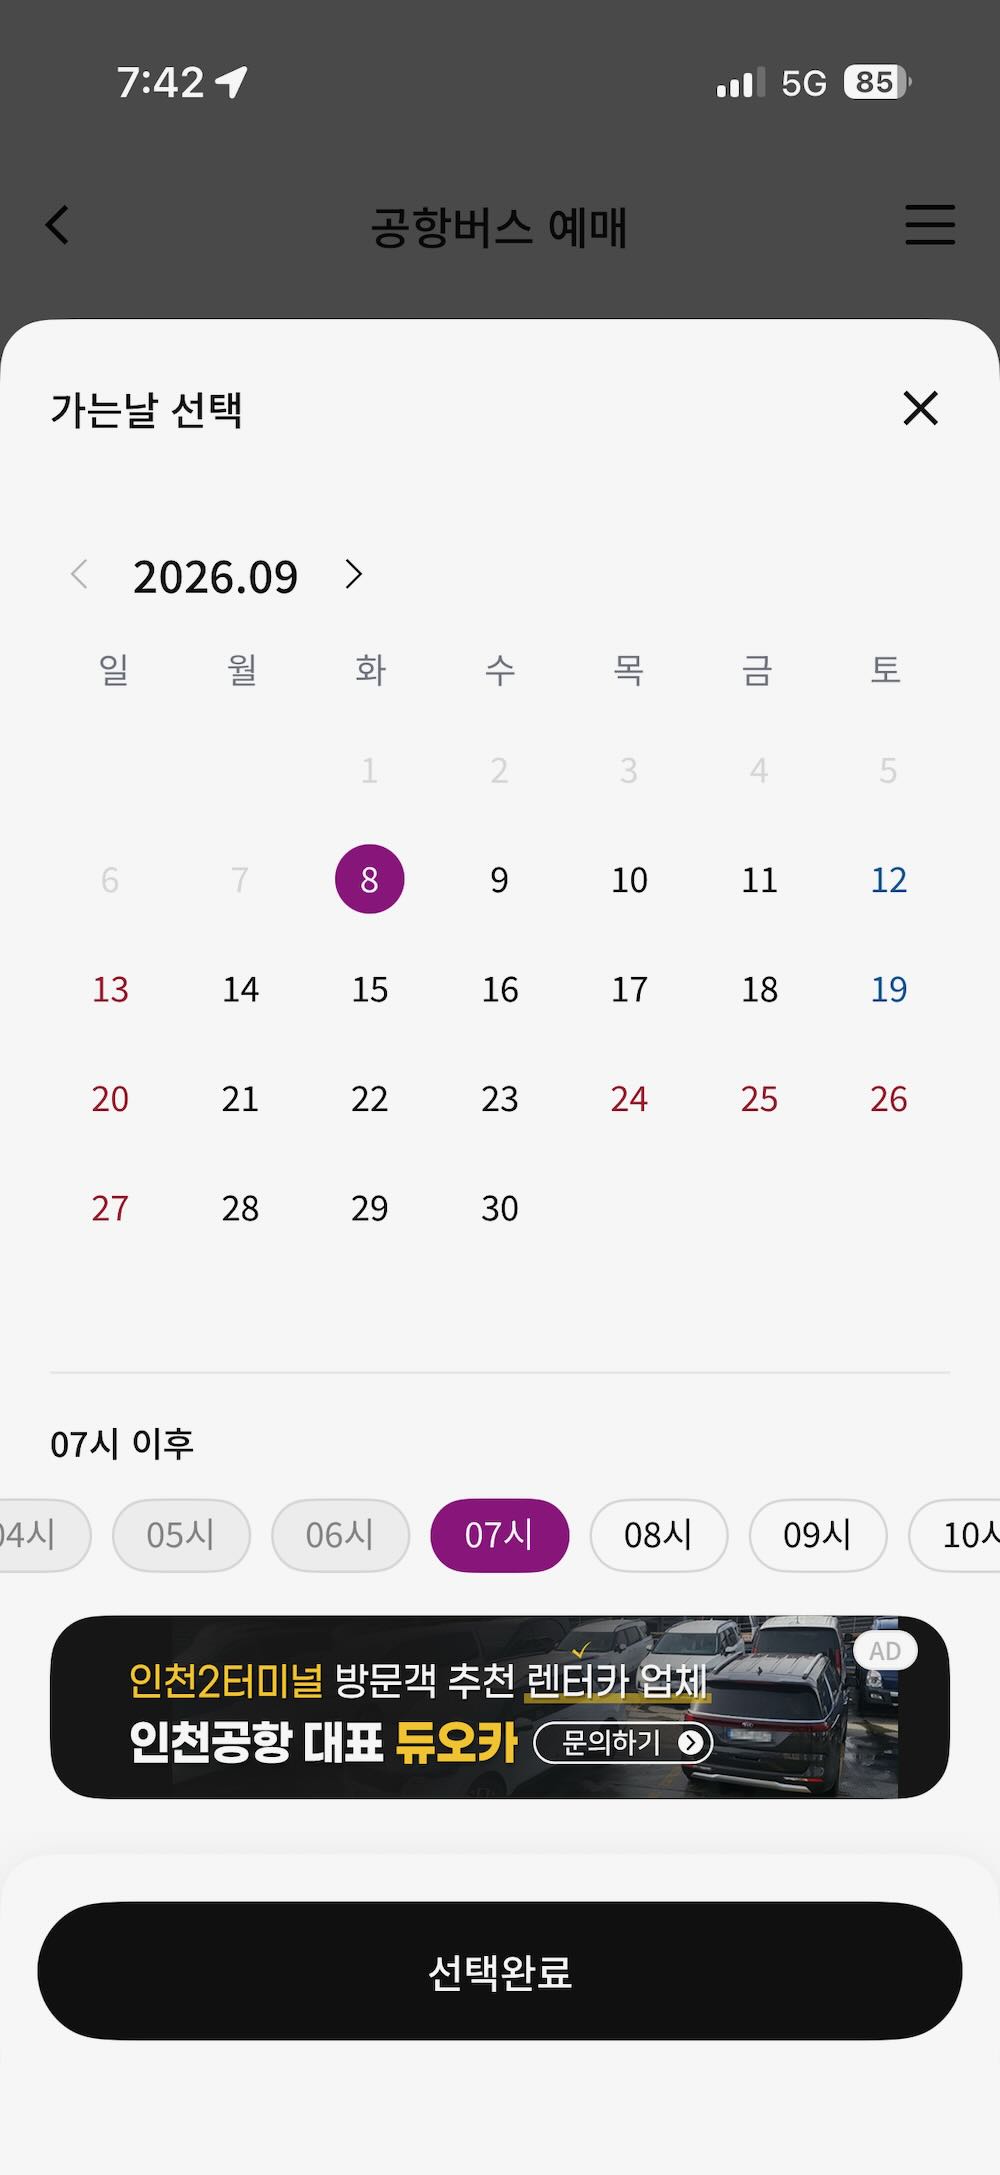 123
123Step 6 — Check the card and tap 버스 조회 (Search buses)
You are back on the booking card, now filled in. Confirm that 편도 (One way) is underlined, that the two stop names are the right way round — the ⇄ button swaps them — and that the date is correct. Then tap the black 버스 조회 button.
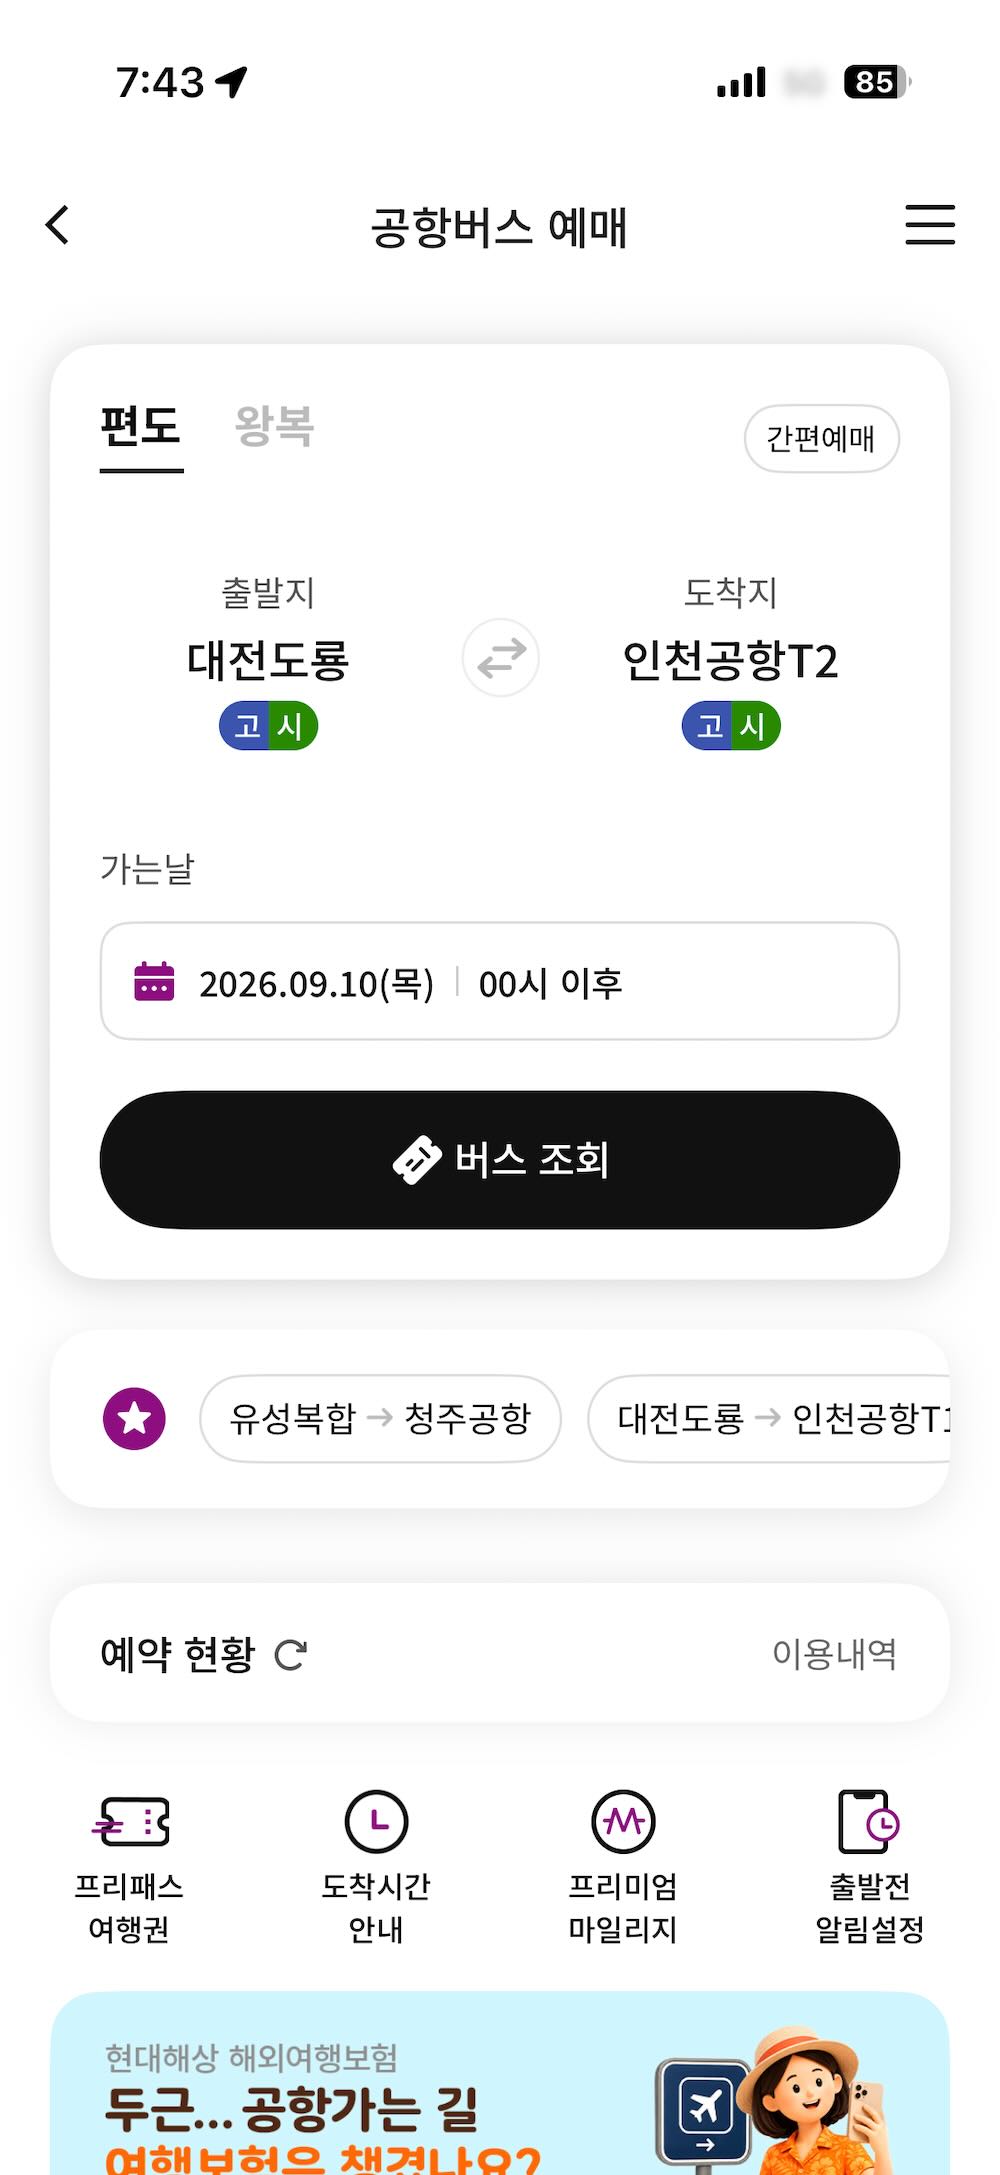 1
1Step 7 — Dismiss the operator notice
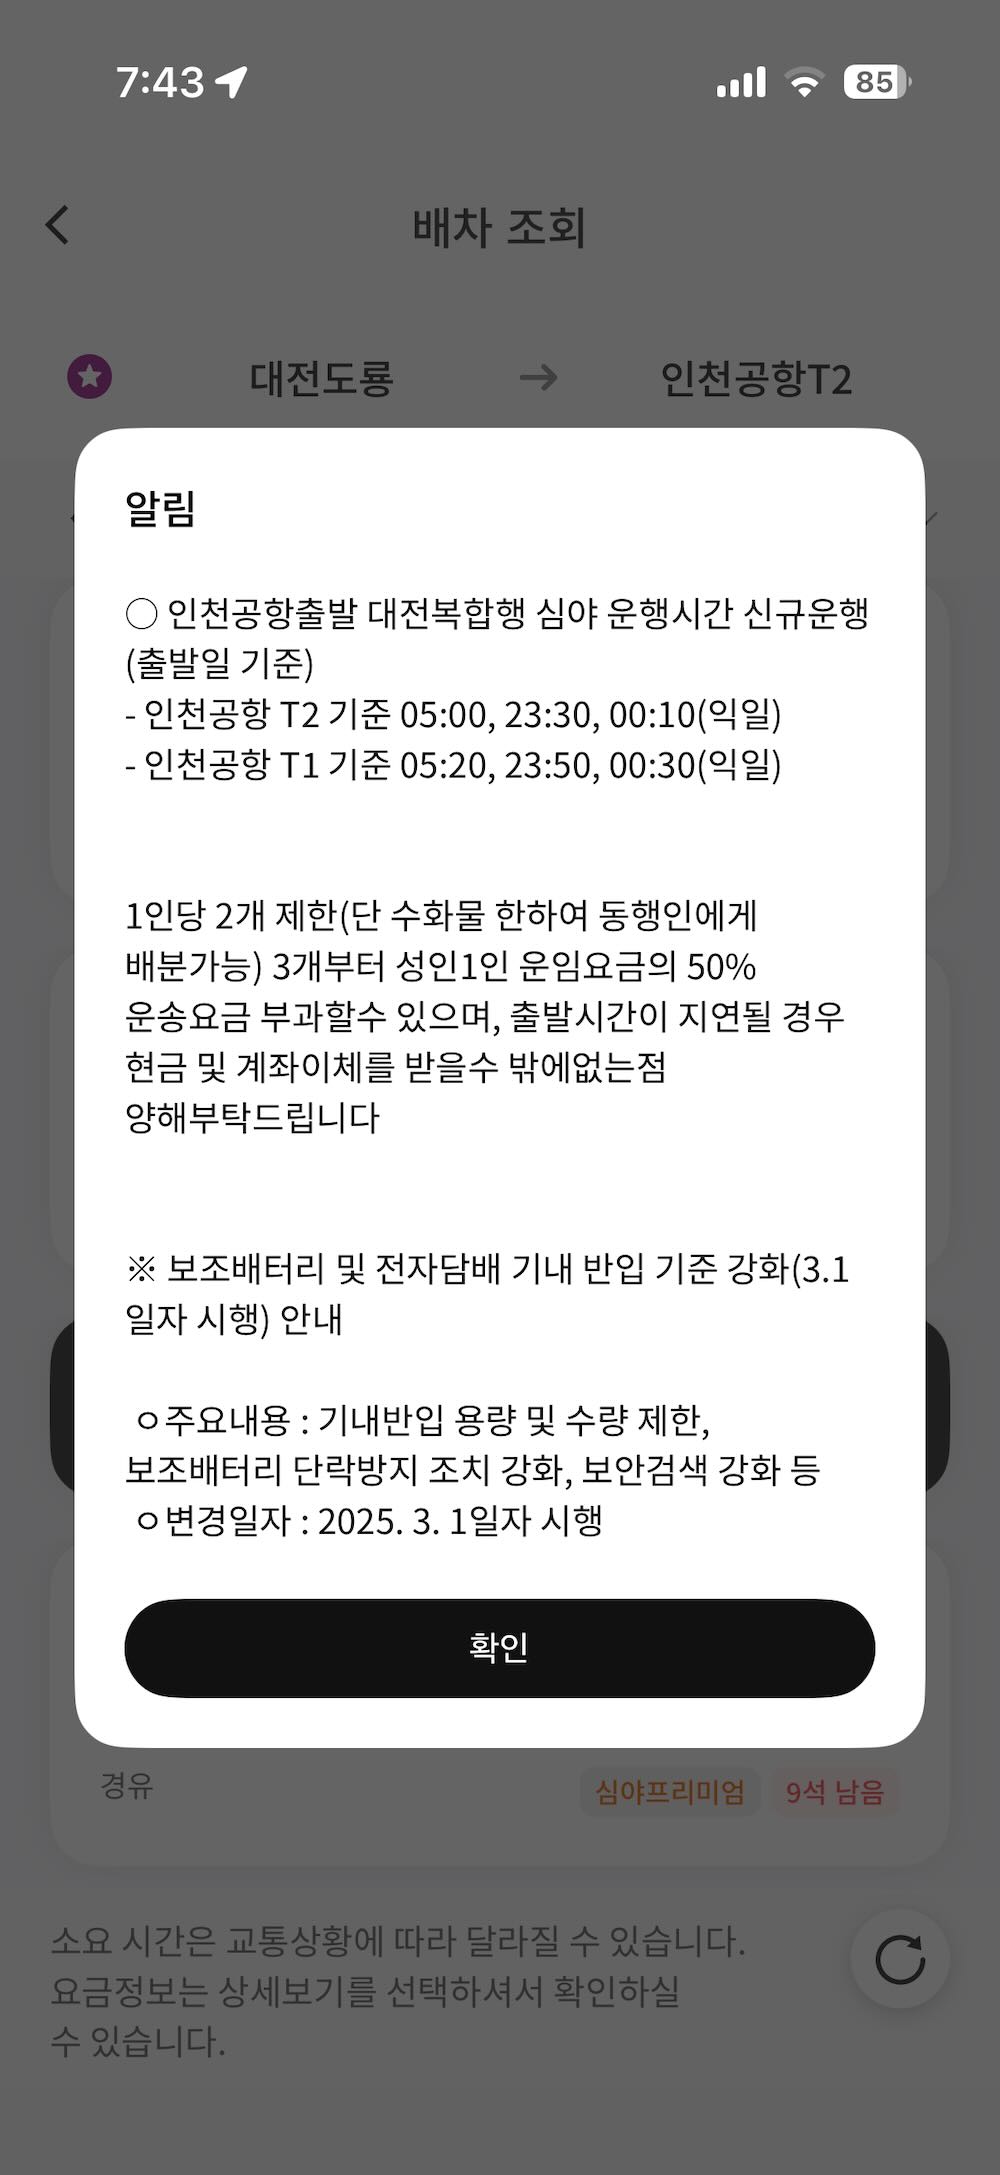
A notice from the bus company appears. Tap 확인 (OK). It is worth knowing what it says: you may bring two pieces of luggage per person, and a third piece can be charged at 50% of an adult fare.
 1
1Step 8 — Choose your departure
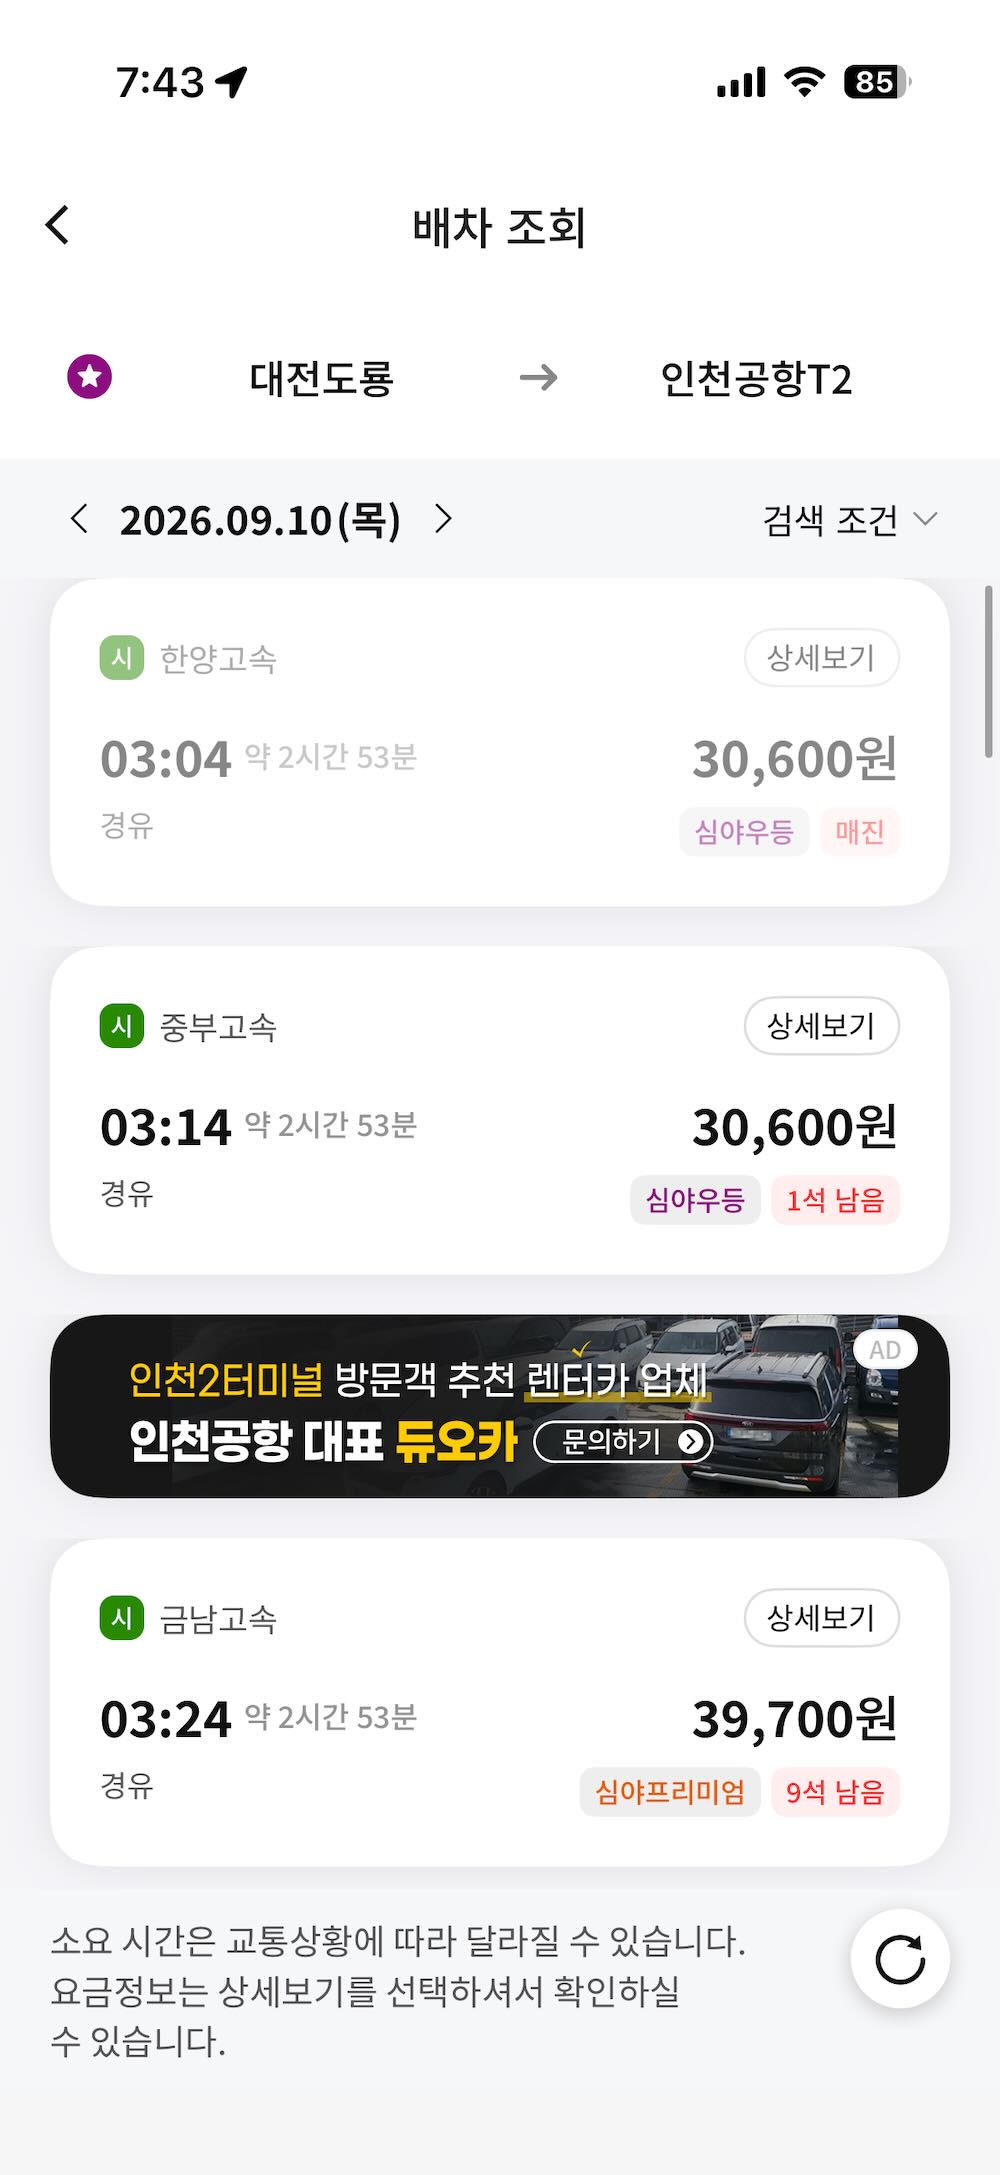
Each card is one bus: the operator, the departure time, the journey time (약 2시간 53분 = about 2 h 53 min), and the fare. The tags at the bottom right tell you whether you can still book:
- 매진 — sold out, in red. You cannot take this bus.
- 1석 남음 — 1 seat left. 9석 남음 — 9 seats left.
- 심야우등 / 심야프리미엄 — late-night deluxe / premium class. Fewer, wider seats; premium costs more. Both are comfortable.
- 경유 — this bus makes a stop on the way.
Tap anywhere on a card that is not sold out.
 1
1Step 9 — Pick your seat
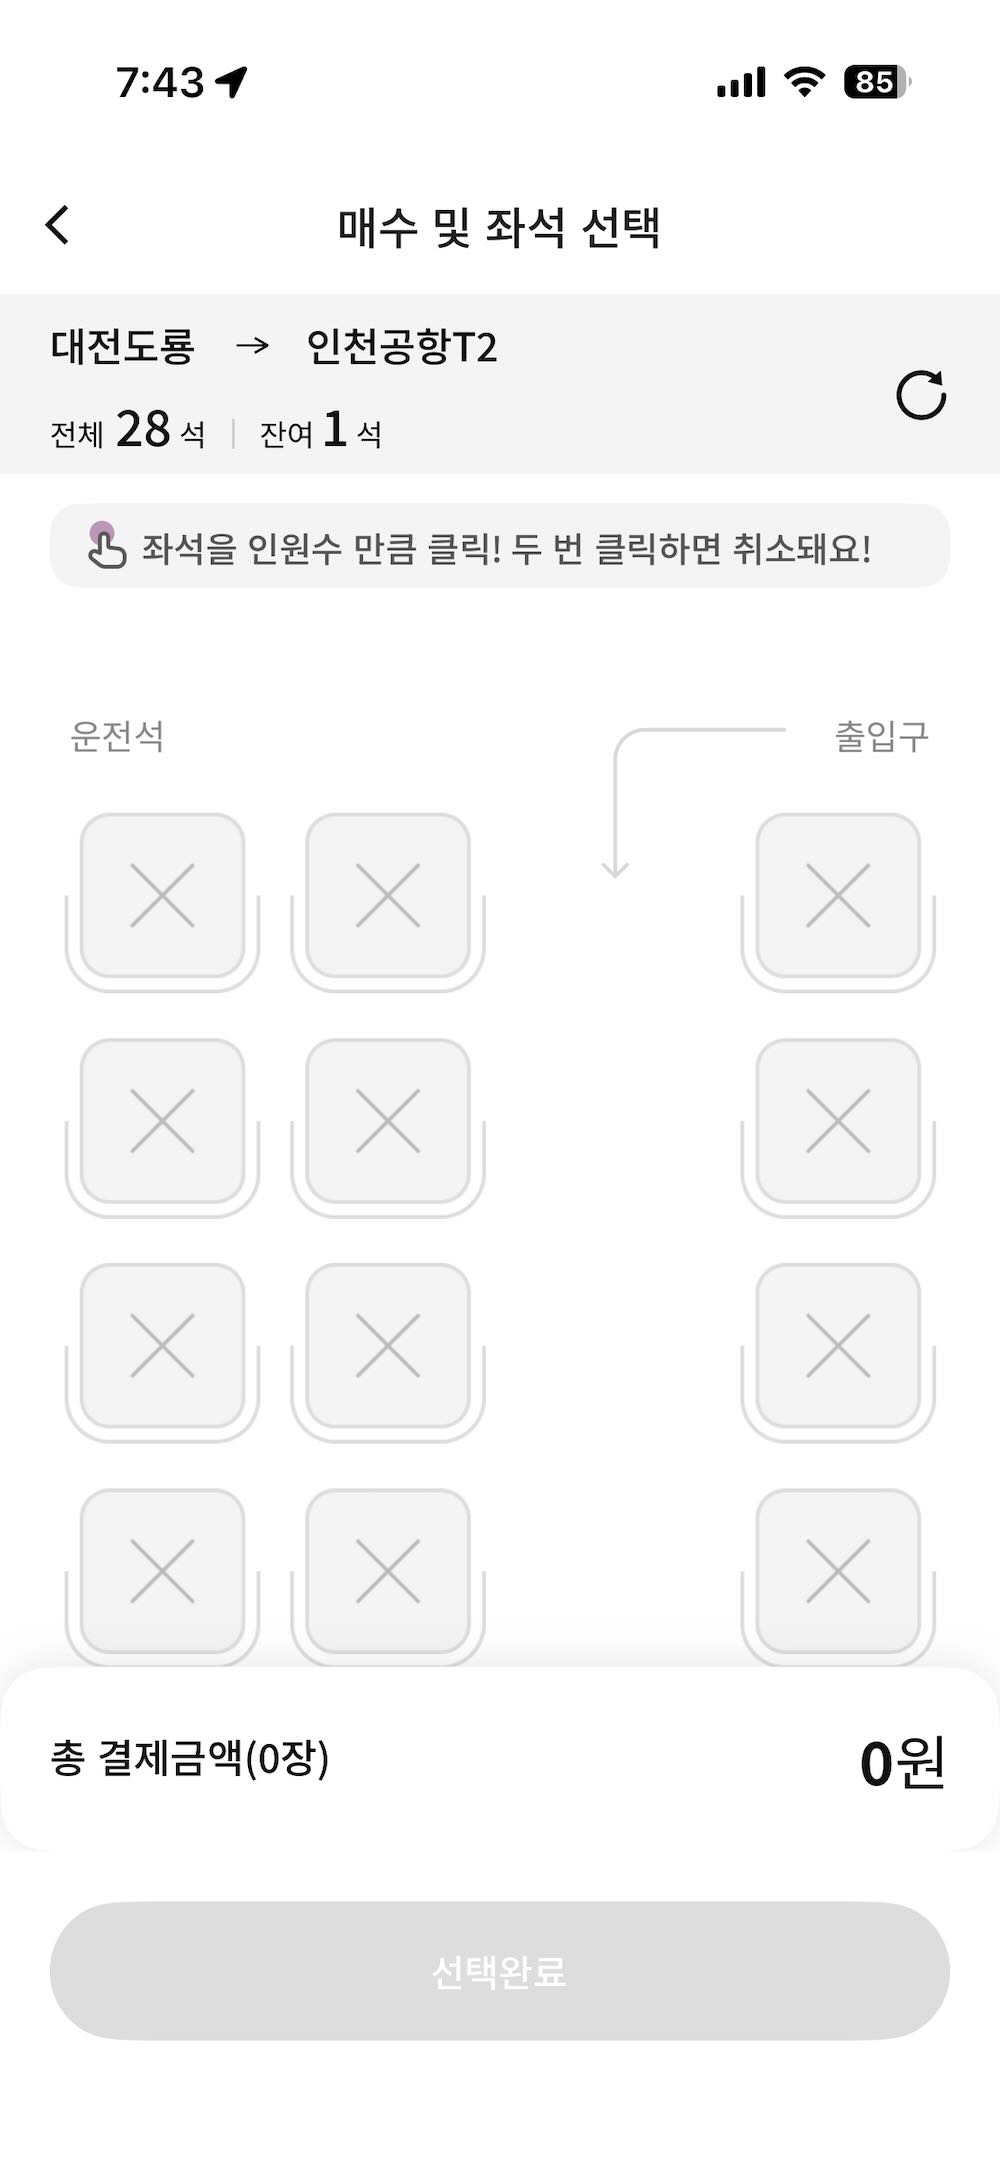
The seat map opens. 전체 28석 is the total number of seats and 잔여 N석 is how many are free. Seats marked ✕ are taken; tap a free seat to select it, and tap it again to release it. Tap one seat per traveller.
The chips 일반 / 아동 / 중고생 / 보훈 set the fare type — adult, child, middle or high school student, and veteran. Leave it on 일반 (Adult); the others require Korean ID to prove eligibility.
When your seat turns purple, the total appears at the bottom. Tap the black 선택완료.
 1
1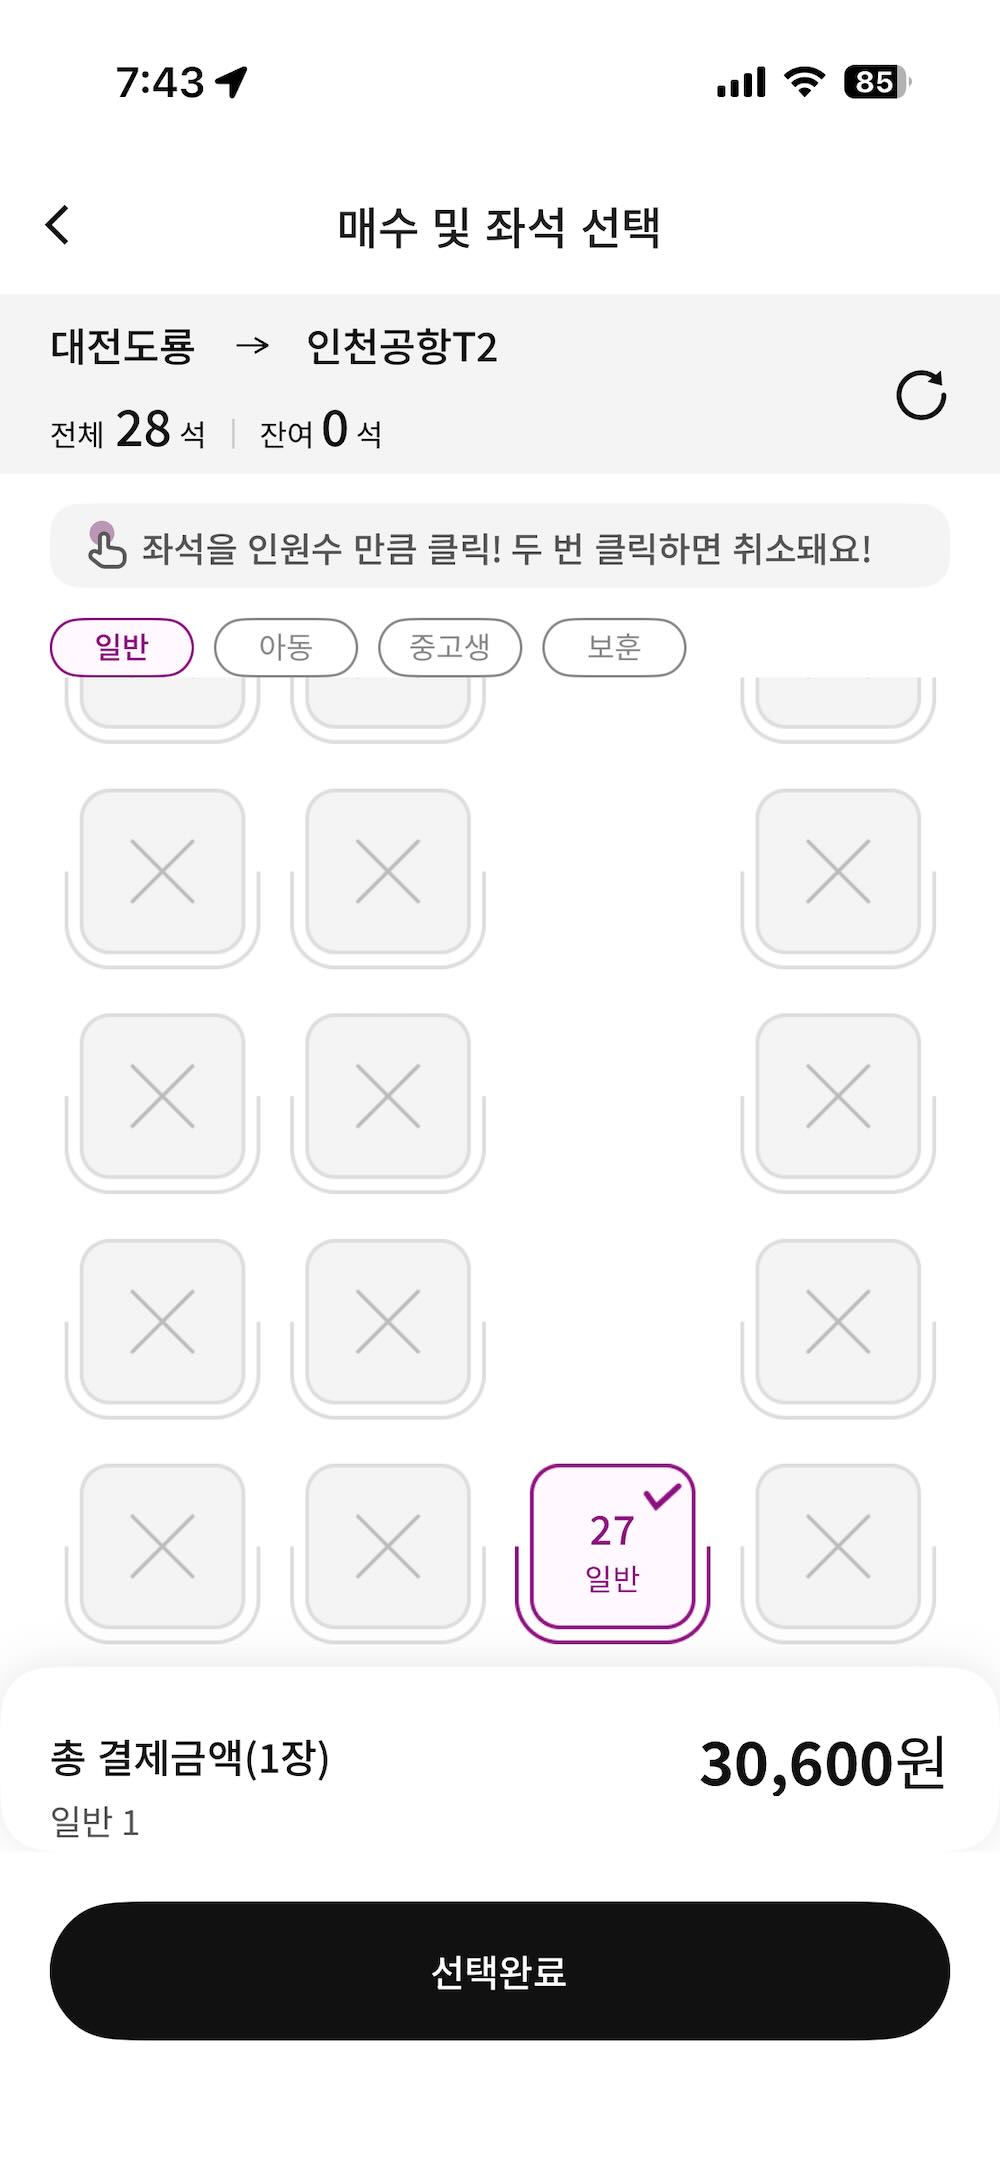 123
123Step 10 — Check the reservation and tap 결제하기 (Pay)
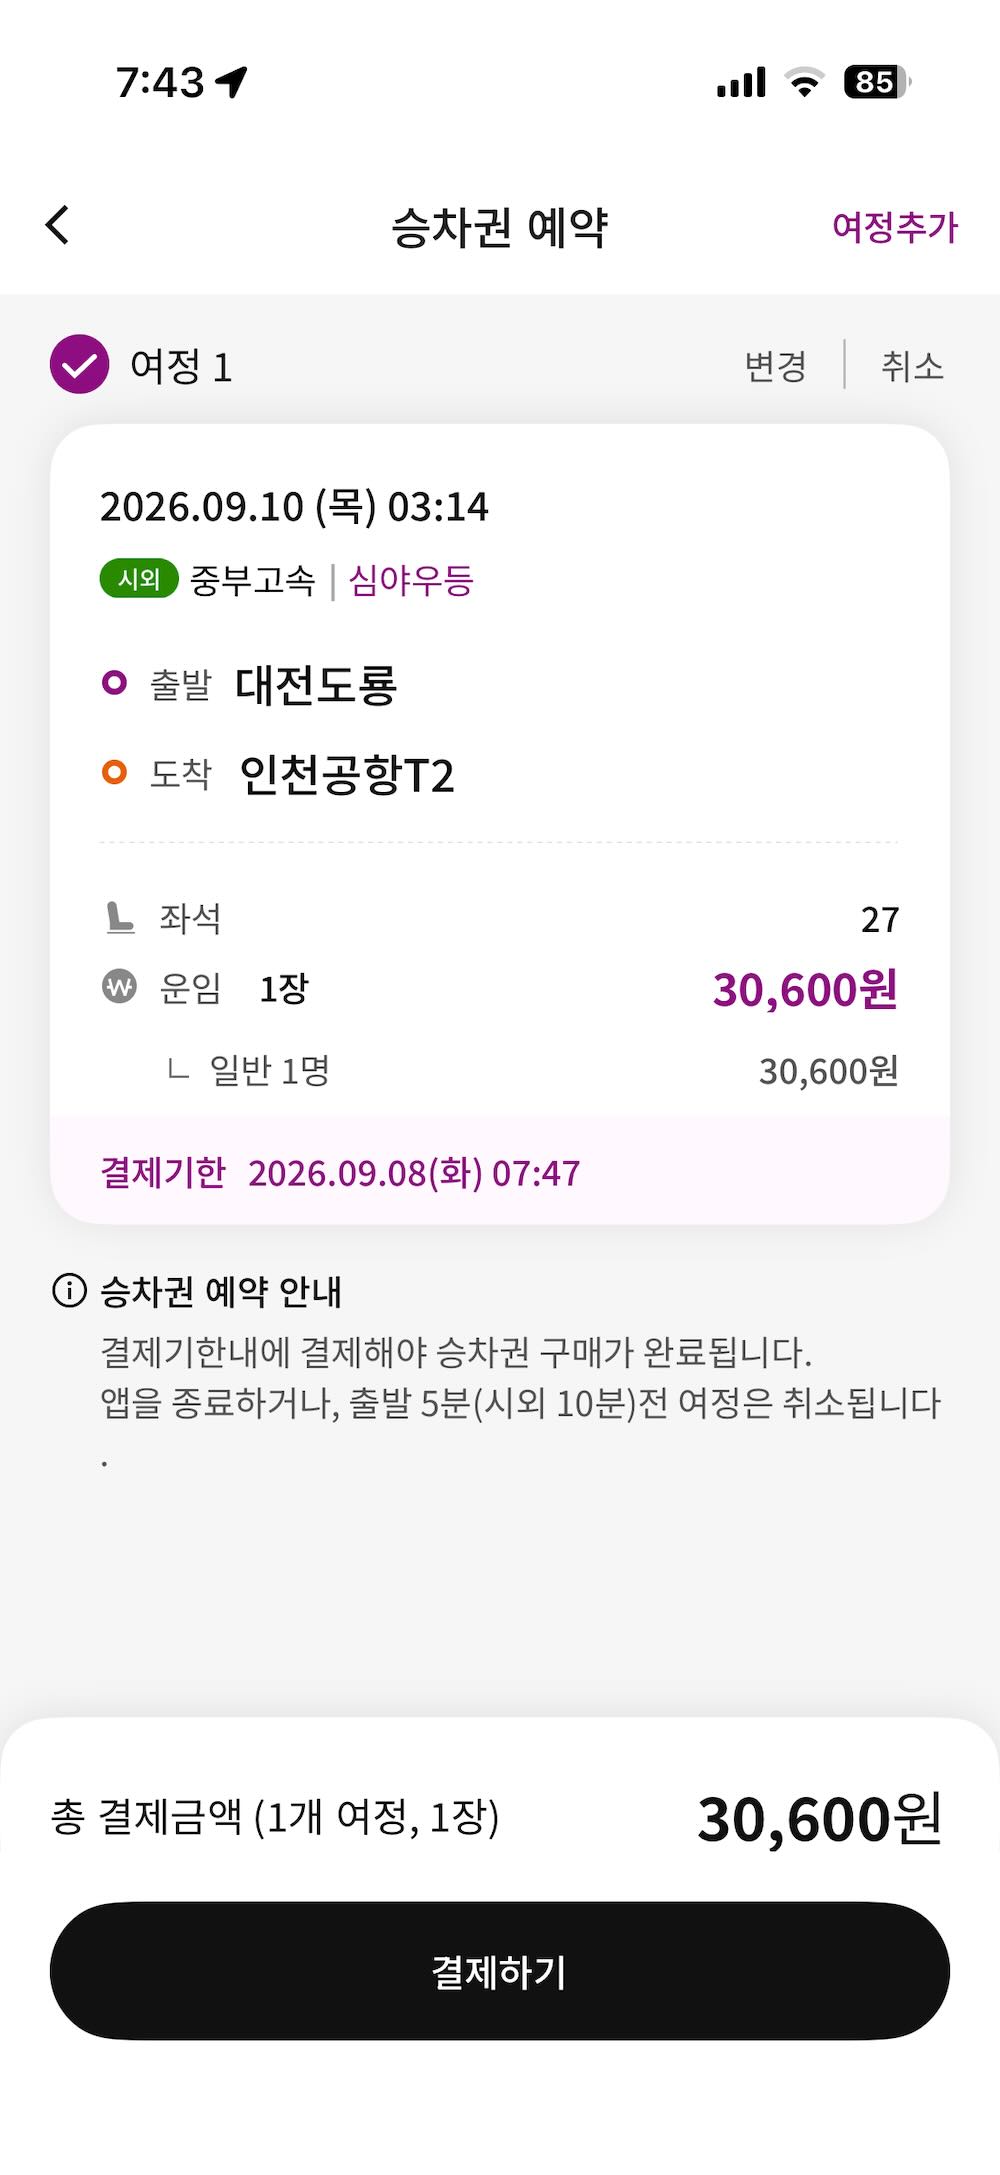
This screen summarises the journey: date and time, operator and class, 출발 (from), 도착 (to), 좌석 (seat number) and 운임 (fare). Read it once more, then tap 결제하기 (Pay).
결제기한 is your payment deadline — the seat is only held until then. The notice also warns that the reservation is cancelled if you close the app, and that it expires 10 minutes before departure for an intercity bus. Do not leave the app between here and the end of Step 12.
 12
12Step 11 — Choose 신용/체크 등록 간편결제 as the payment method
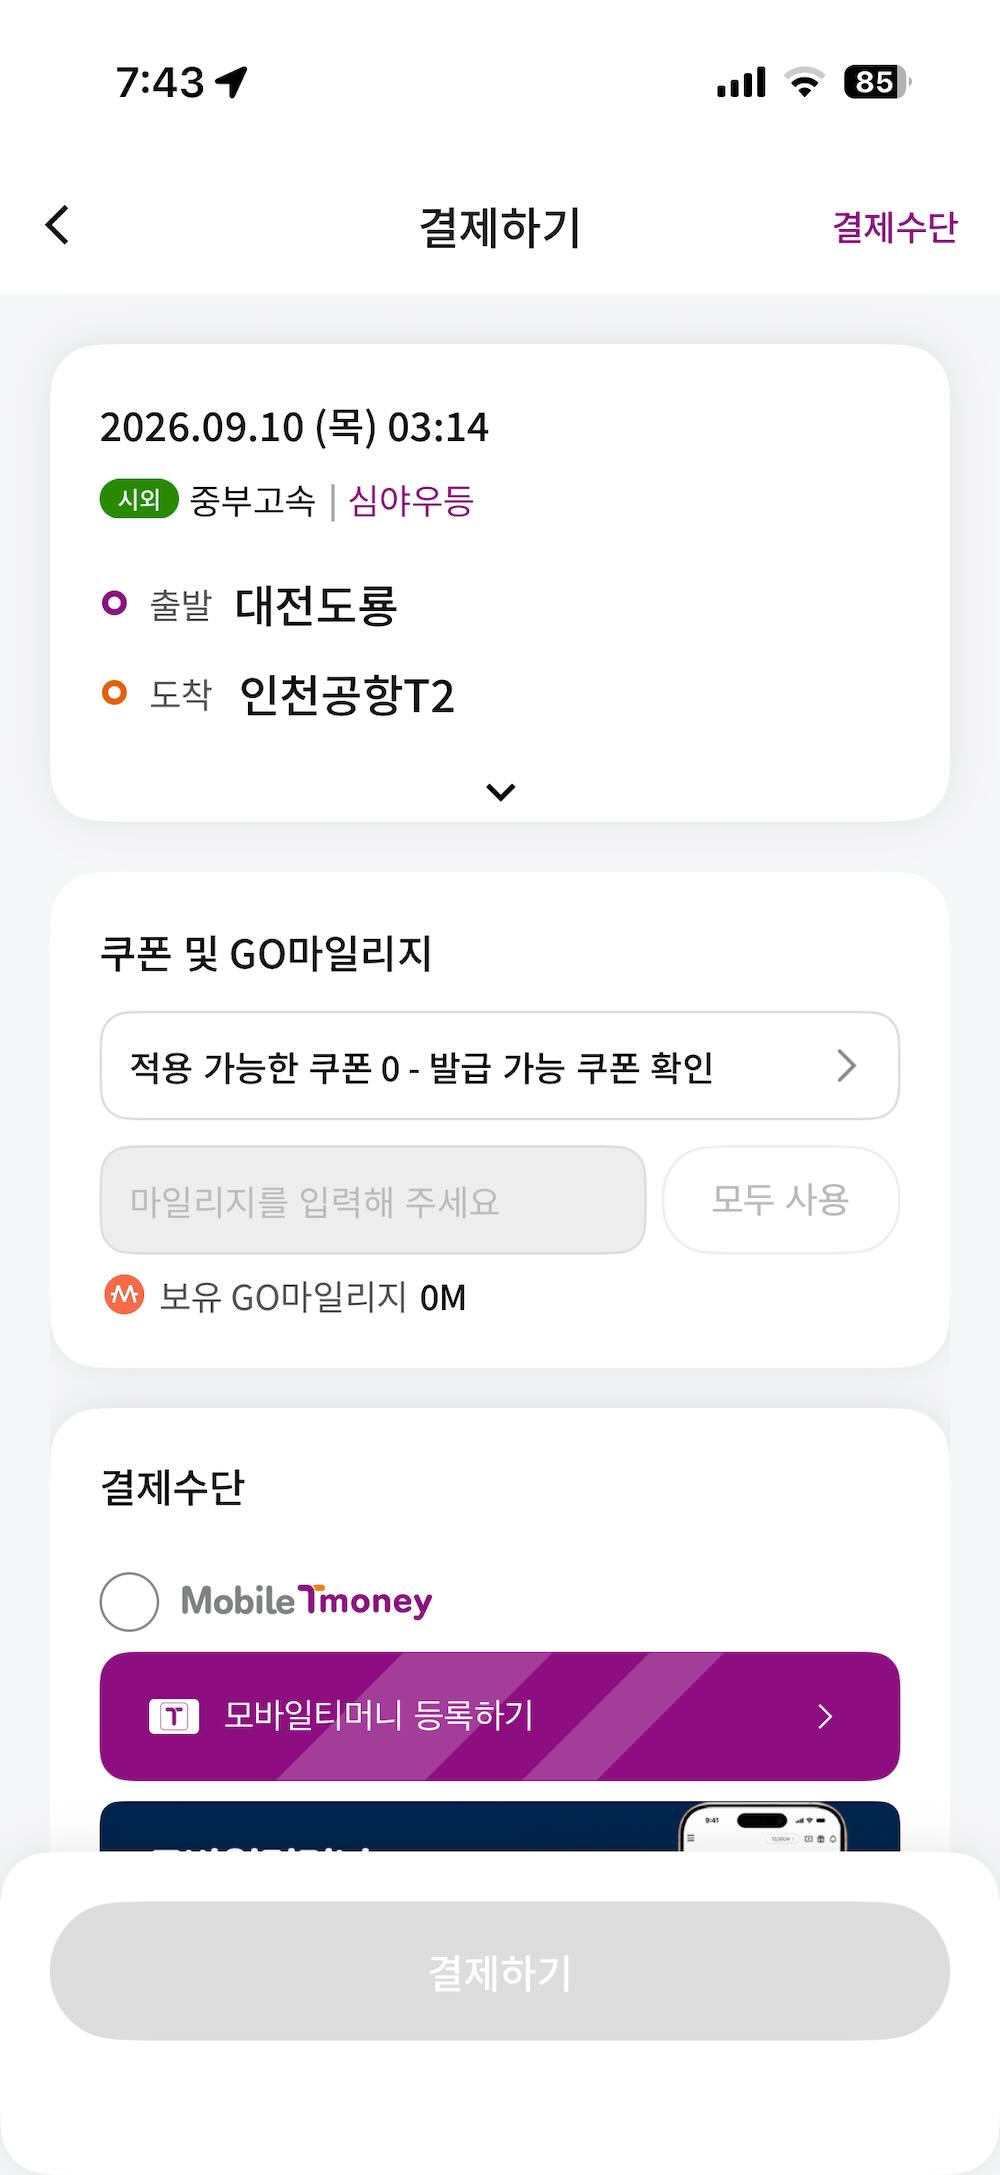
Scroll past 쿠폰 및 GO마일리지 (coupons and points — leave both alone) down to 결제수단, the payment methods. Ignore Mobile Tmoney, N Pay, toss pay and KB Pay: those need separate Korean accounts. Select the last option, 신용/체크 등록 간편결제 — “pay with a registered credit or check card” — and tap the dashed + box below it to add your card.
 1
1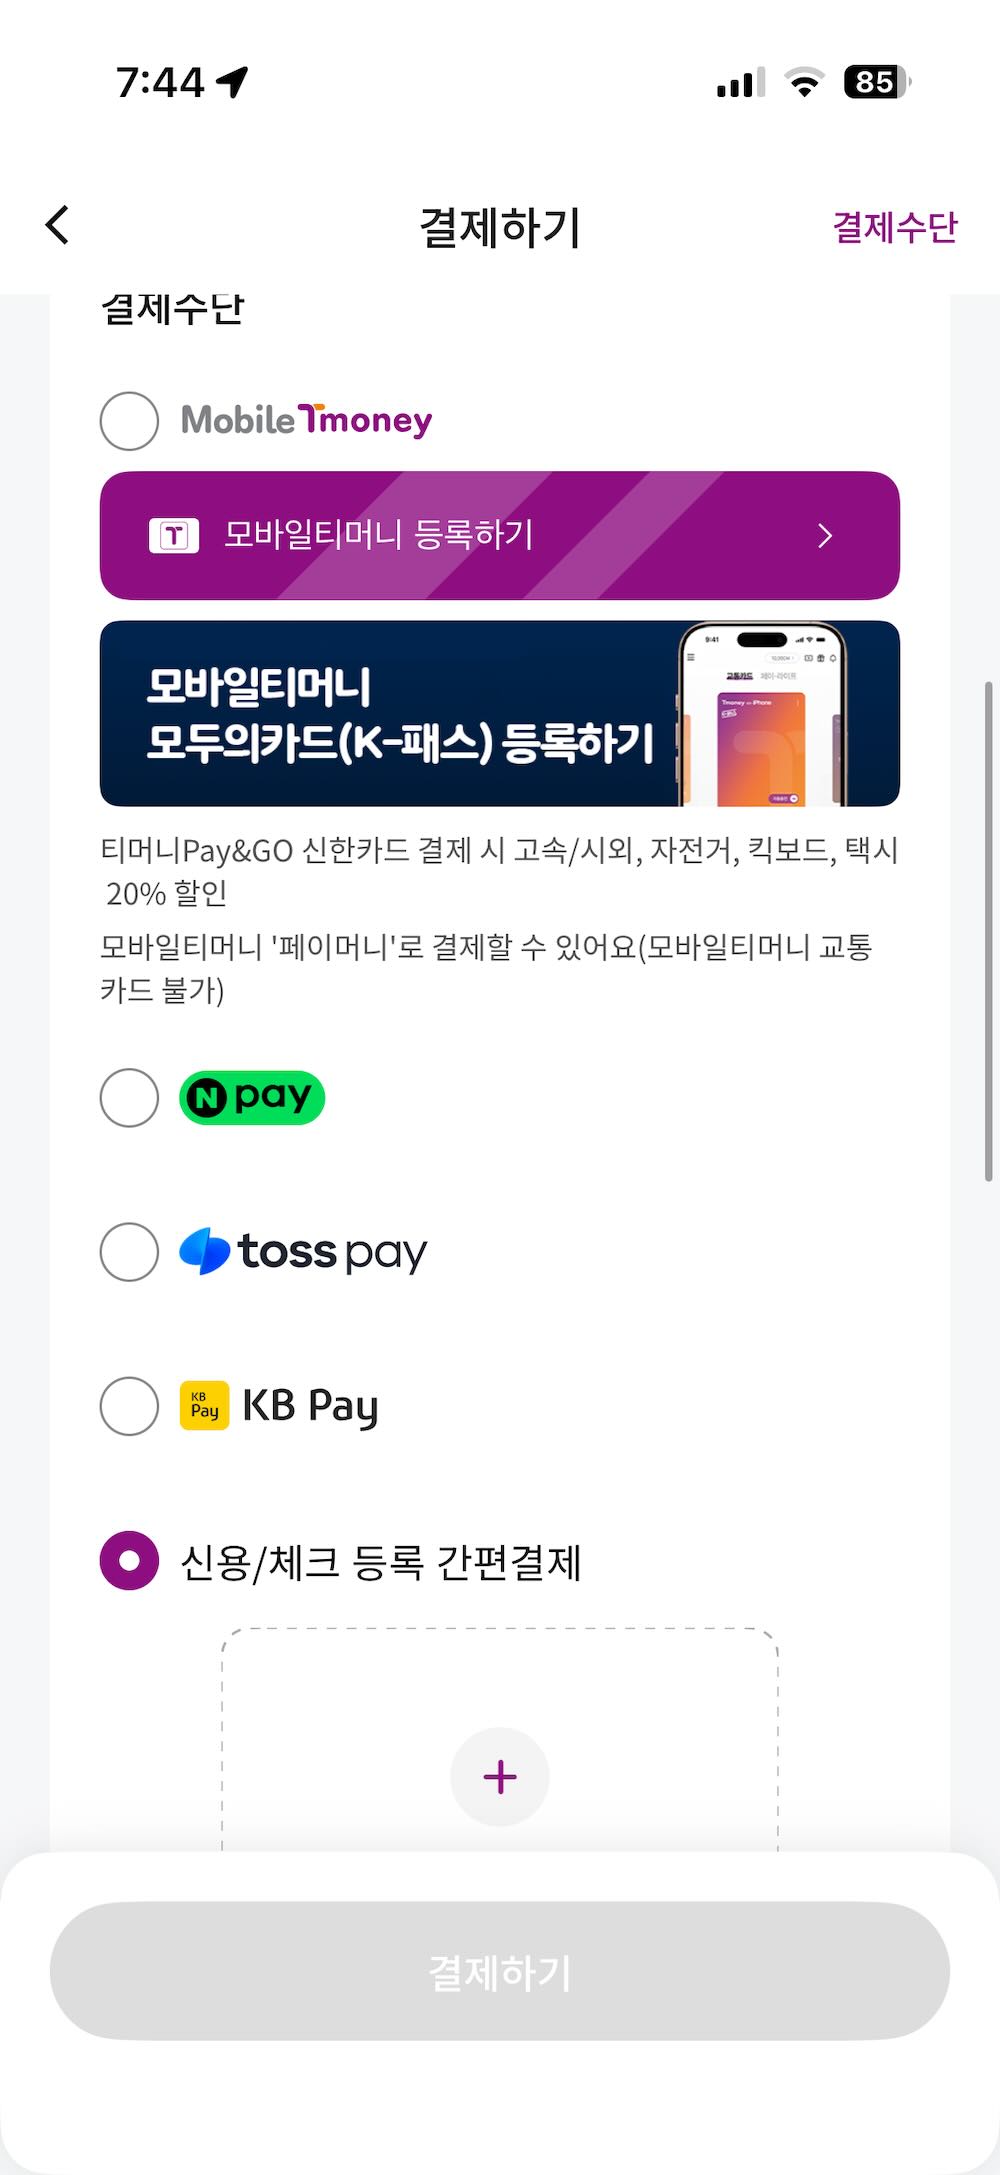 12
12Step 12 — Register your card
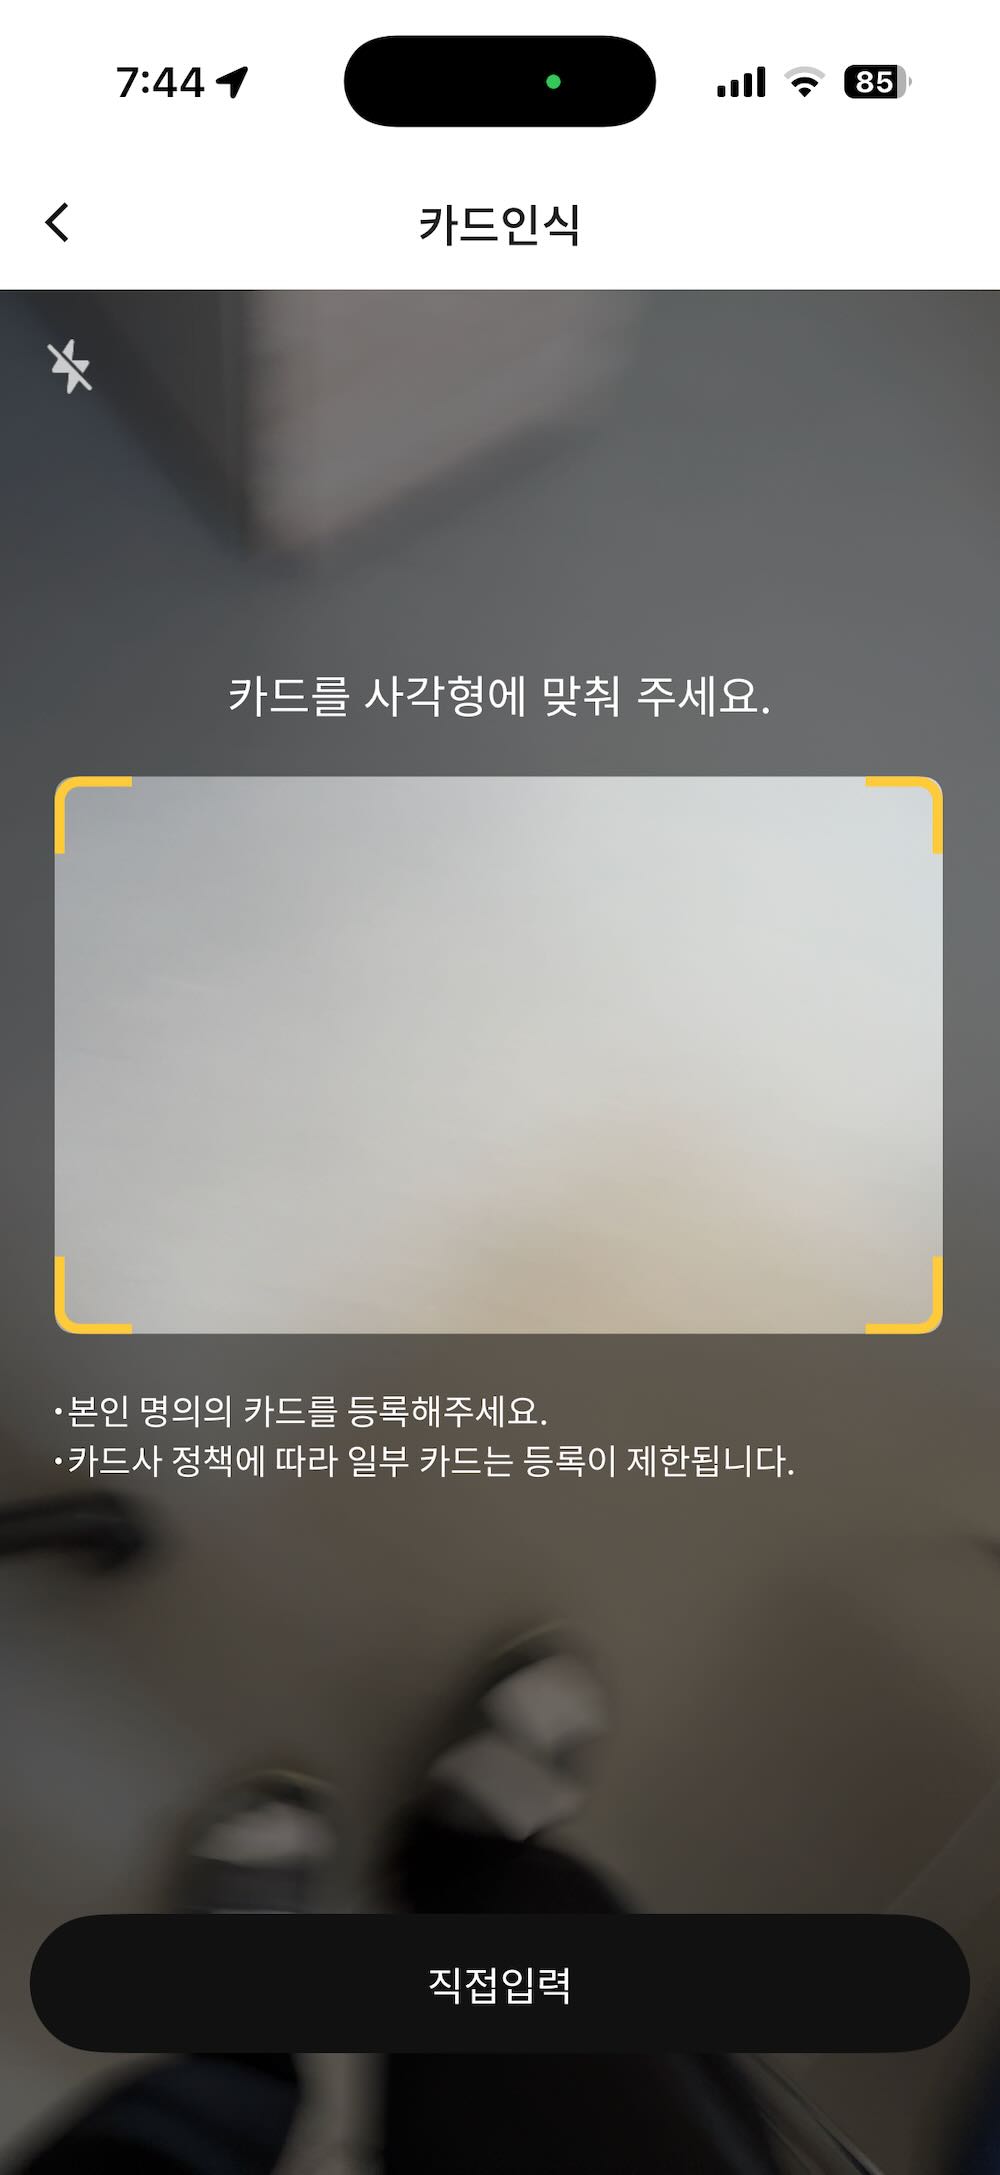
The camera opens to read the card automatically: hold the card inside the yellow frame. If it will not focus — or if your card has no embossed numbers — tap the black 직접입력 button at the bottom and type the details instead. You will be asked for the card number, the expiry date, the first two digits of your card PIN, and your date of birth in YYMMDD form.
The two lines under the frame are the app’s warnings: register a card issued in your own name, and some cards are blocked by their issuer.
 1
1Once the card is registered you return to the payment screen. Tap the black 결제하기 at the bottom one last time, and the purchase is complete.
After paying — finding and reading your ticket
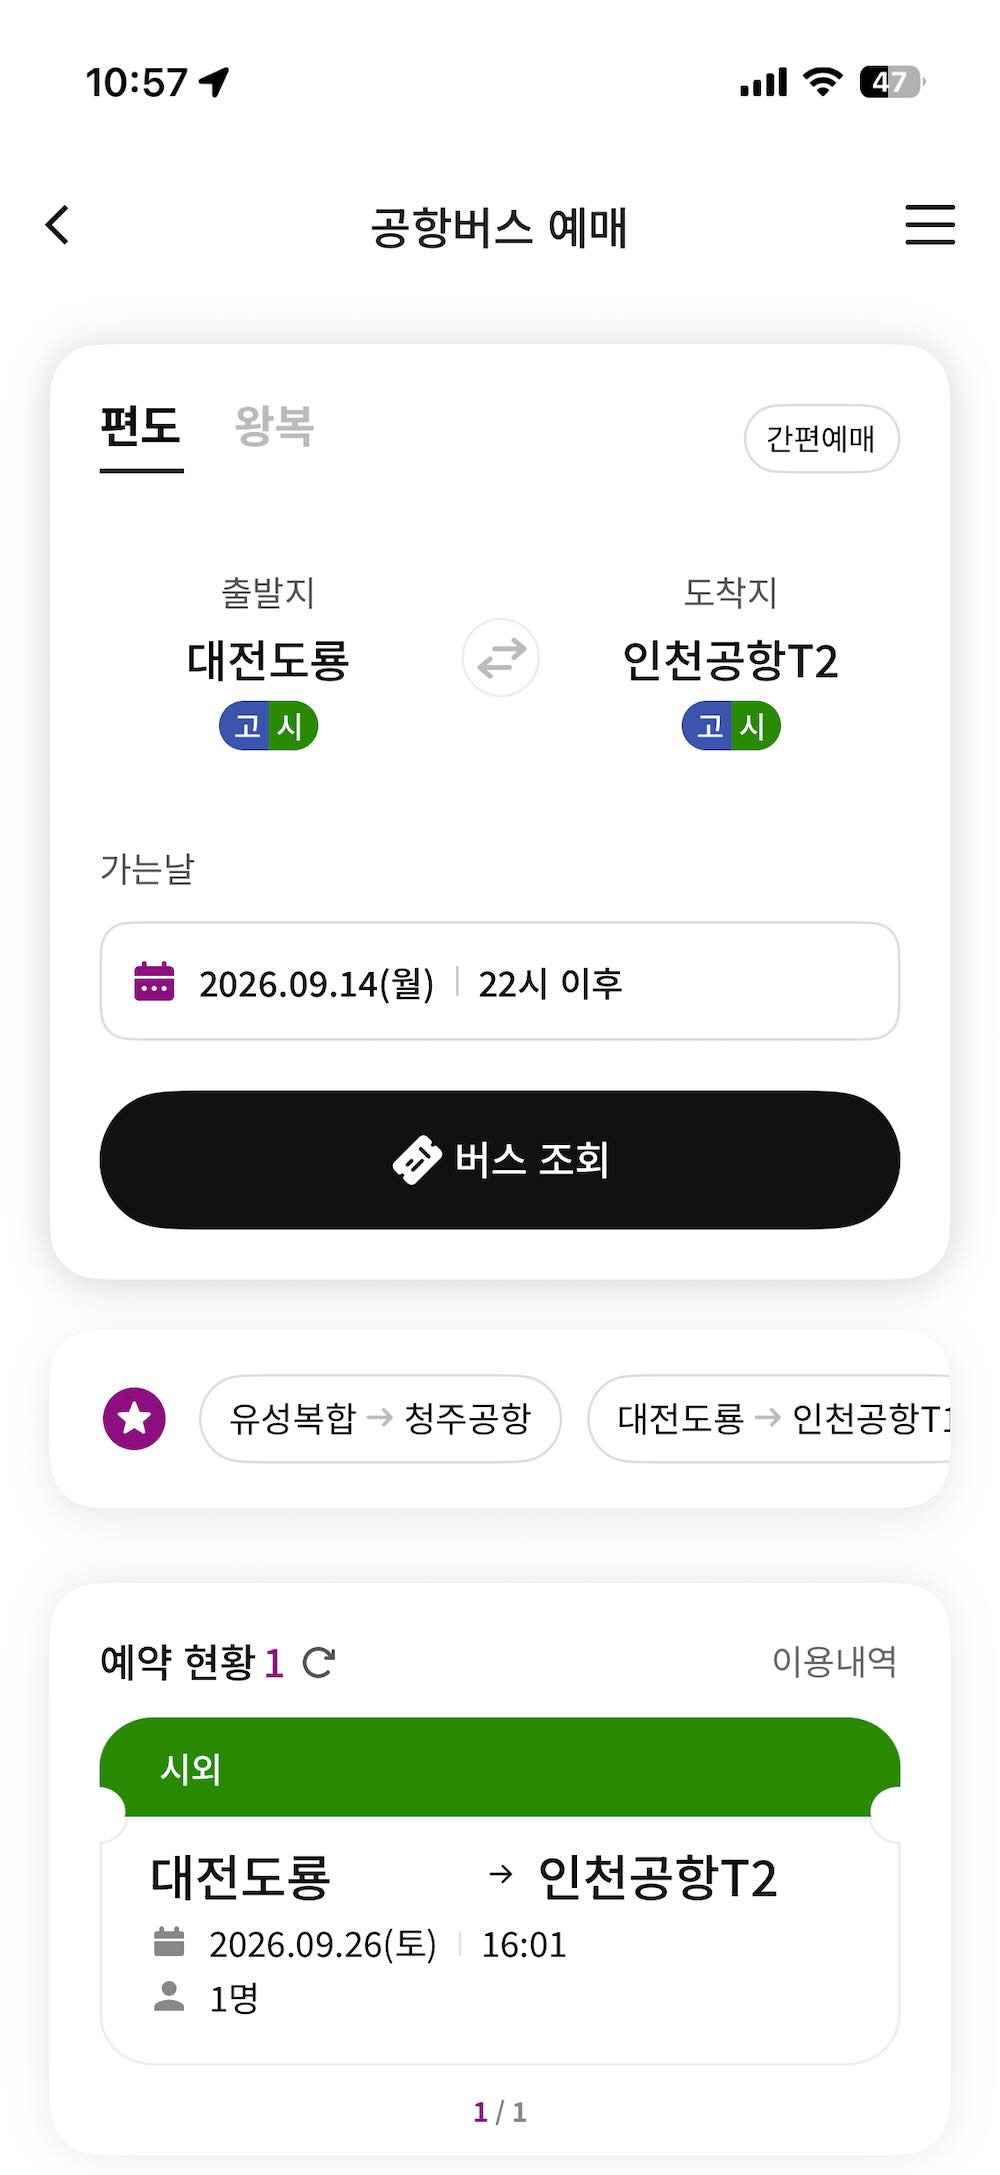
There is no paper ticket. Your ticket lives in the app, on the same booking screen you started from: scroll down to 예약 현황 (Reservation status). The number beside it is how many tickets you are holding. 이용내역, to its right, is your past purchase history.
Tap the card — it shows the route, the date and the number of passengers — to open the ticket itself.
 12
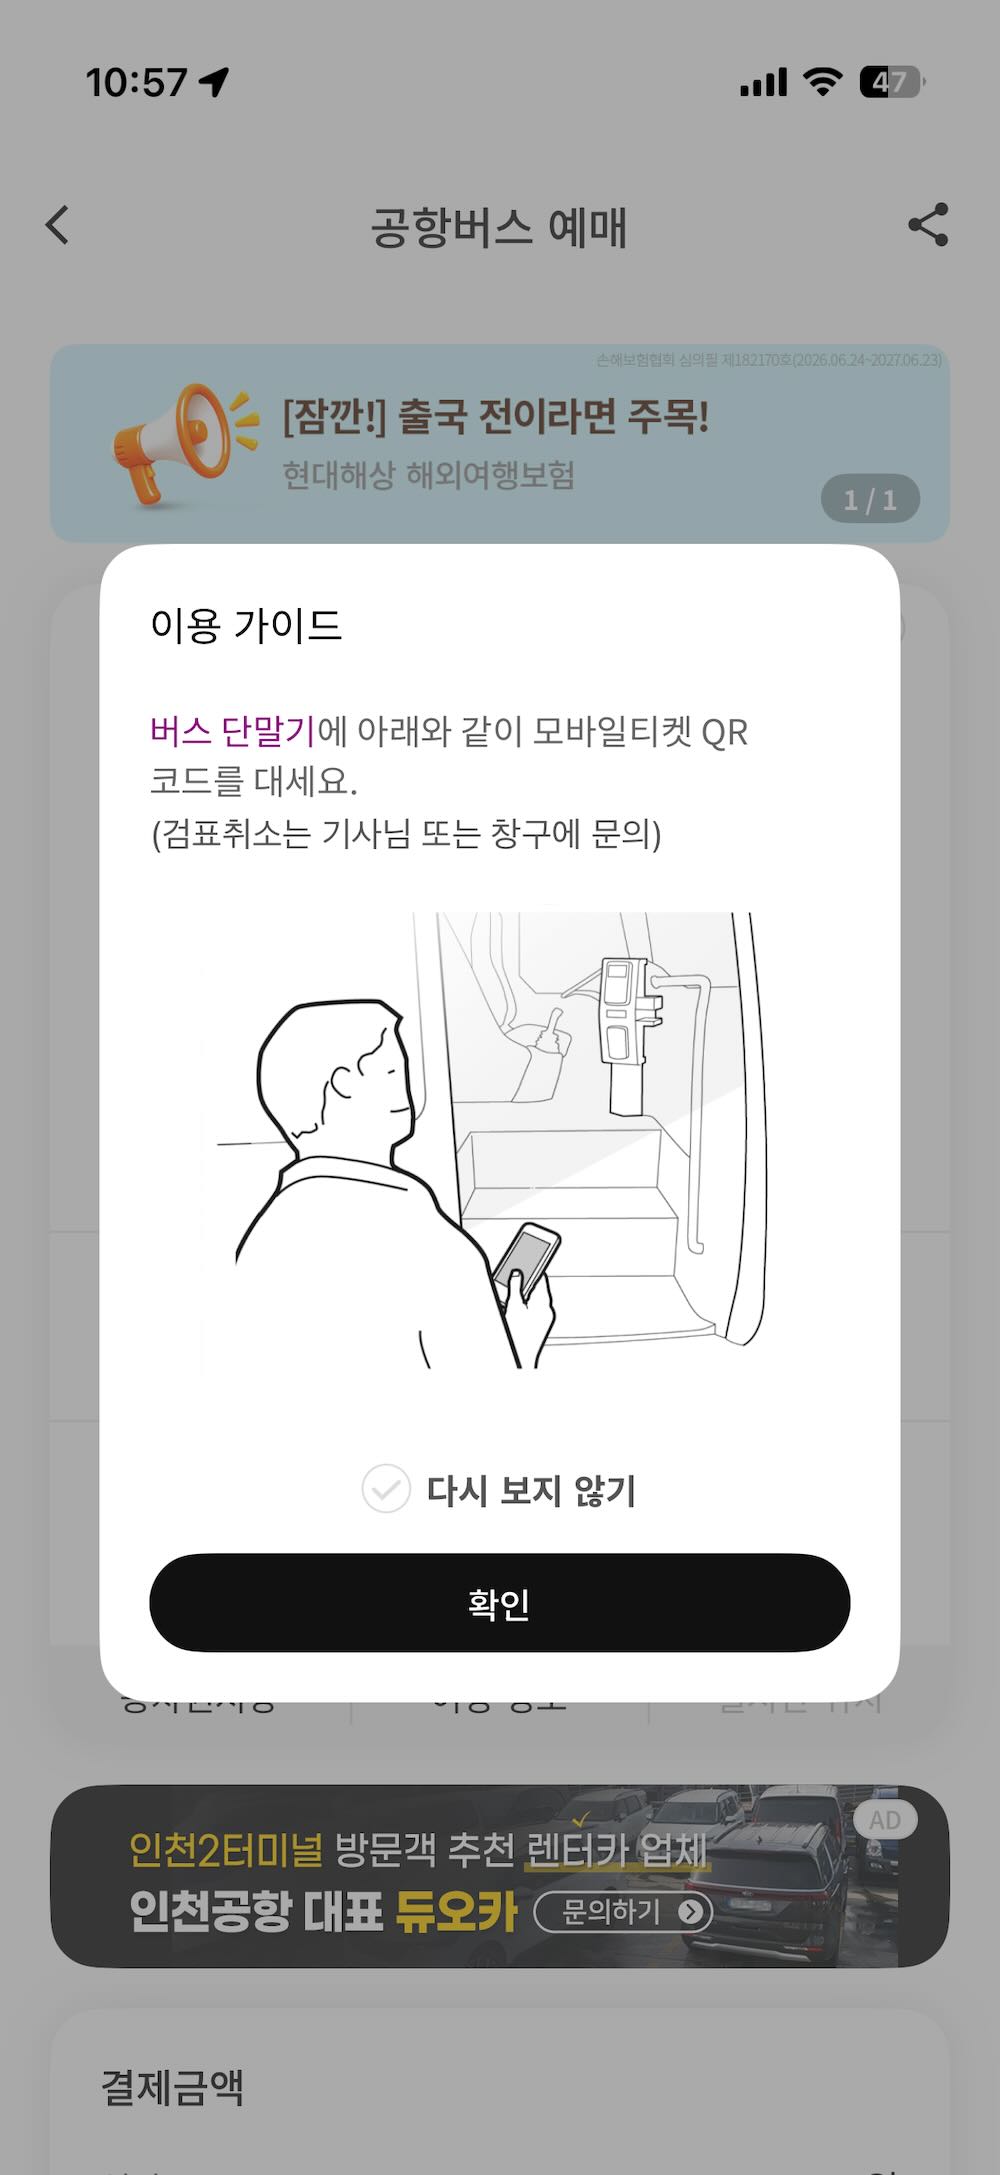
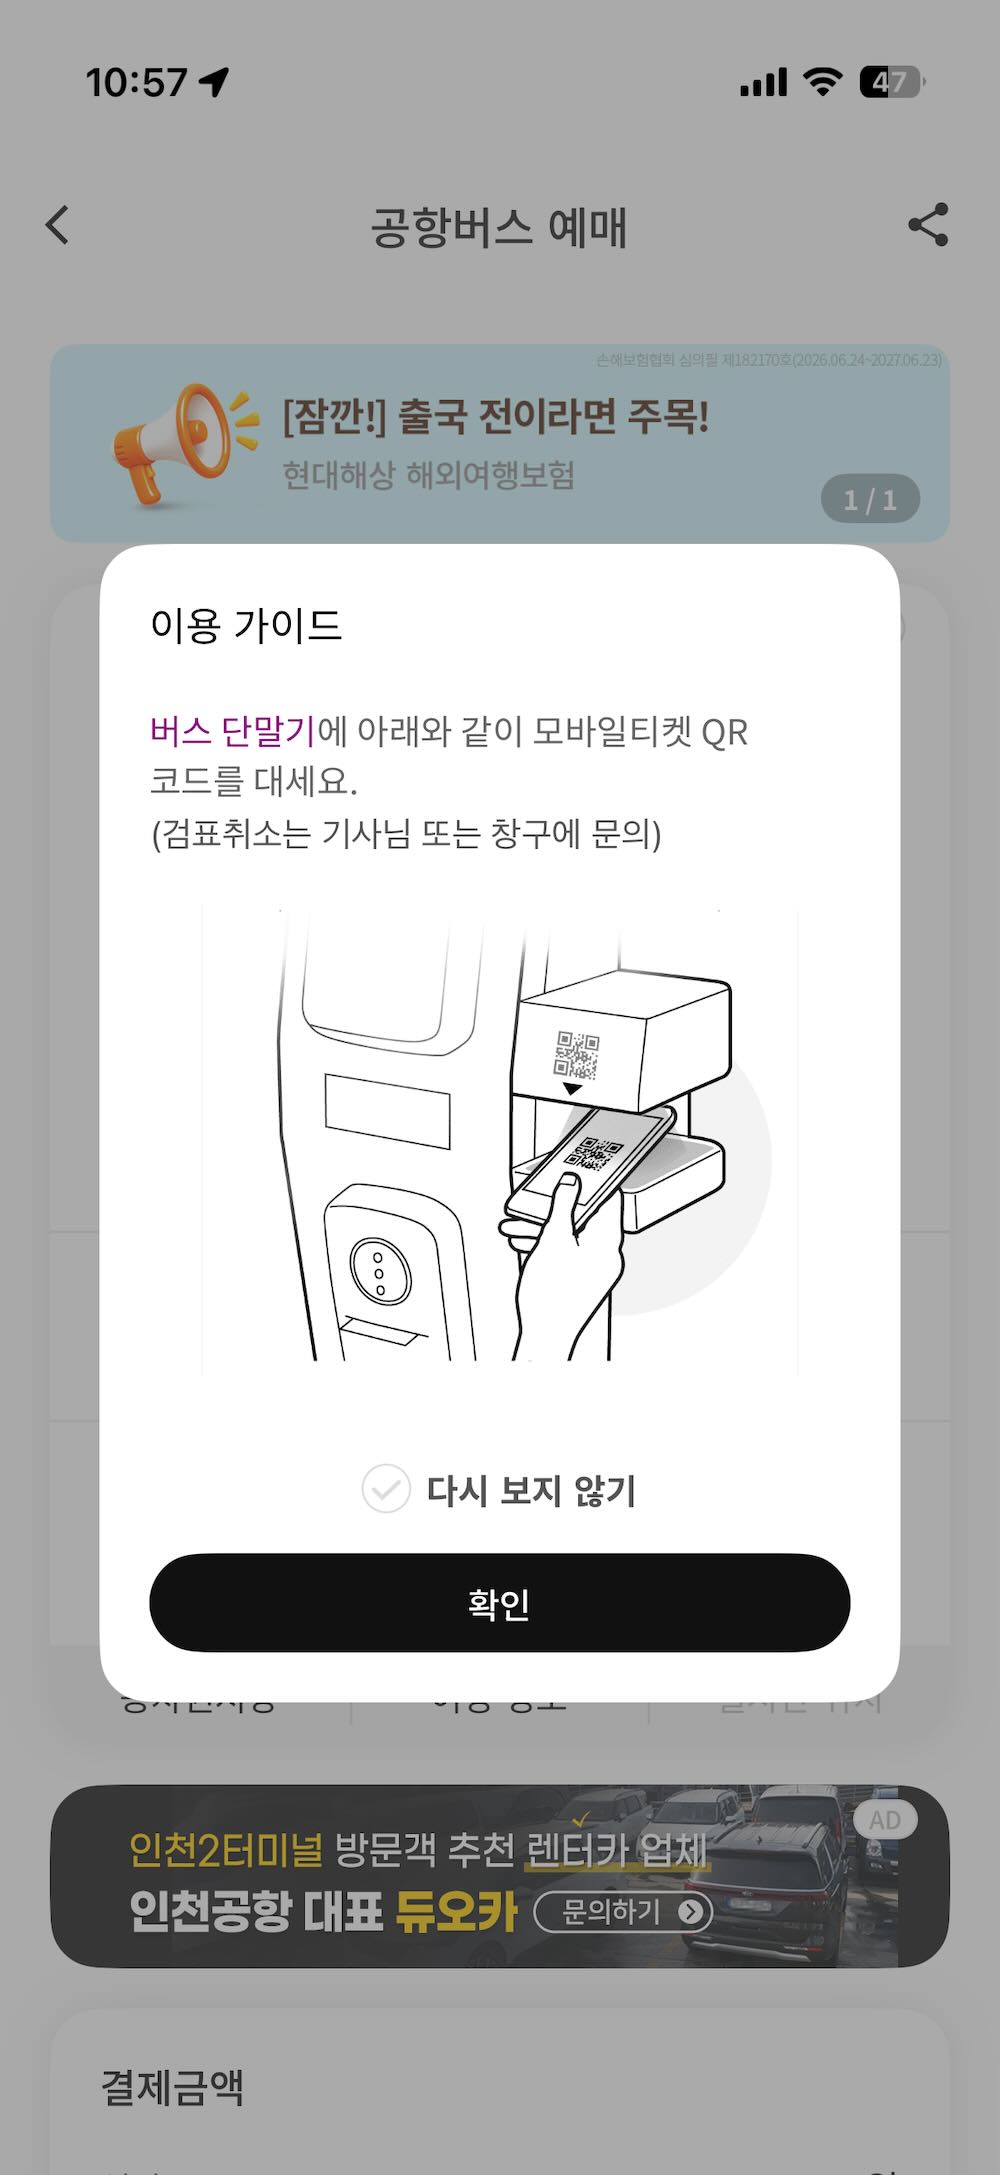
12The first time you open a ticket, an illustrated 이용 가이드 (usage guide) pops up over it. It has two pages and shows the one thing that matters: hold your phone’s QR code against the reader just inside the bus door. Tap 확인 to close it — 다시 보지 않기 above the button means “don’t show this again”.
 1
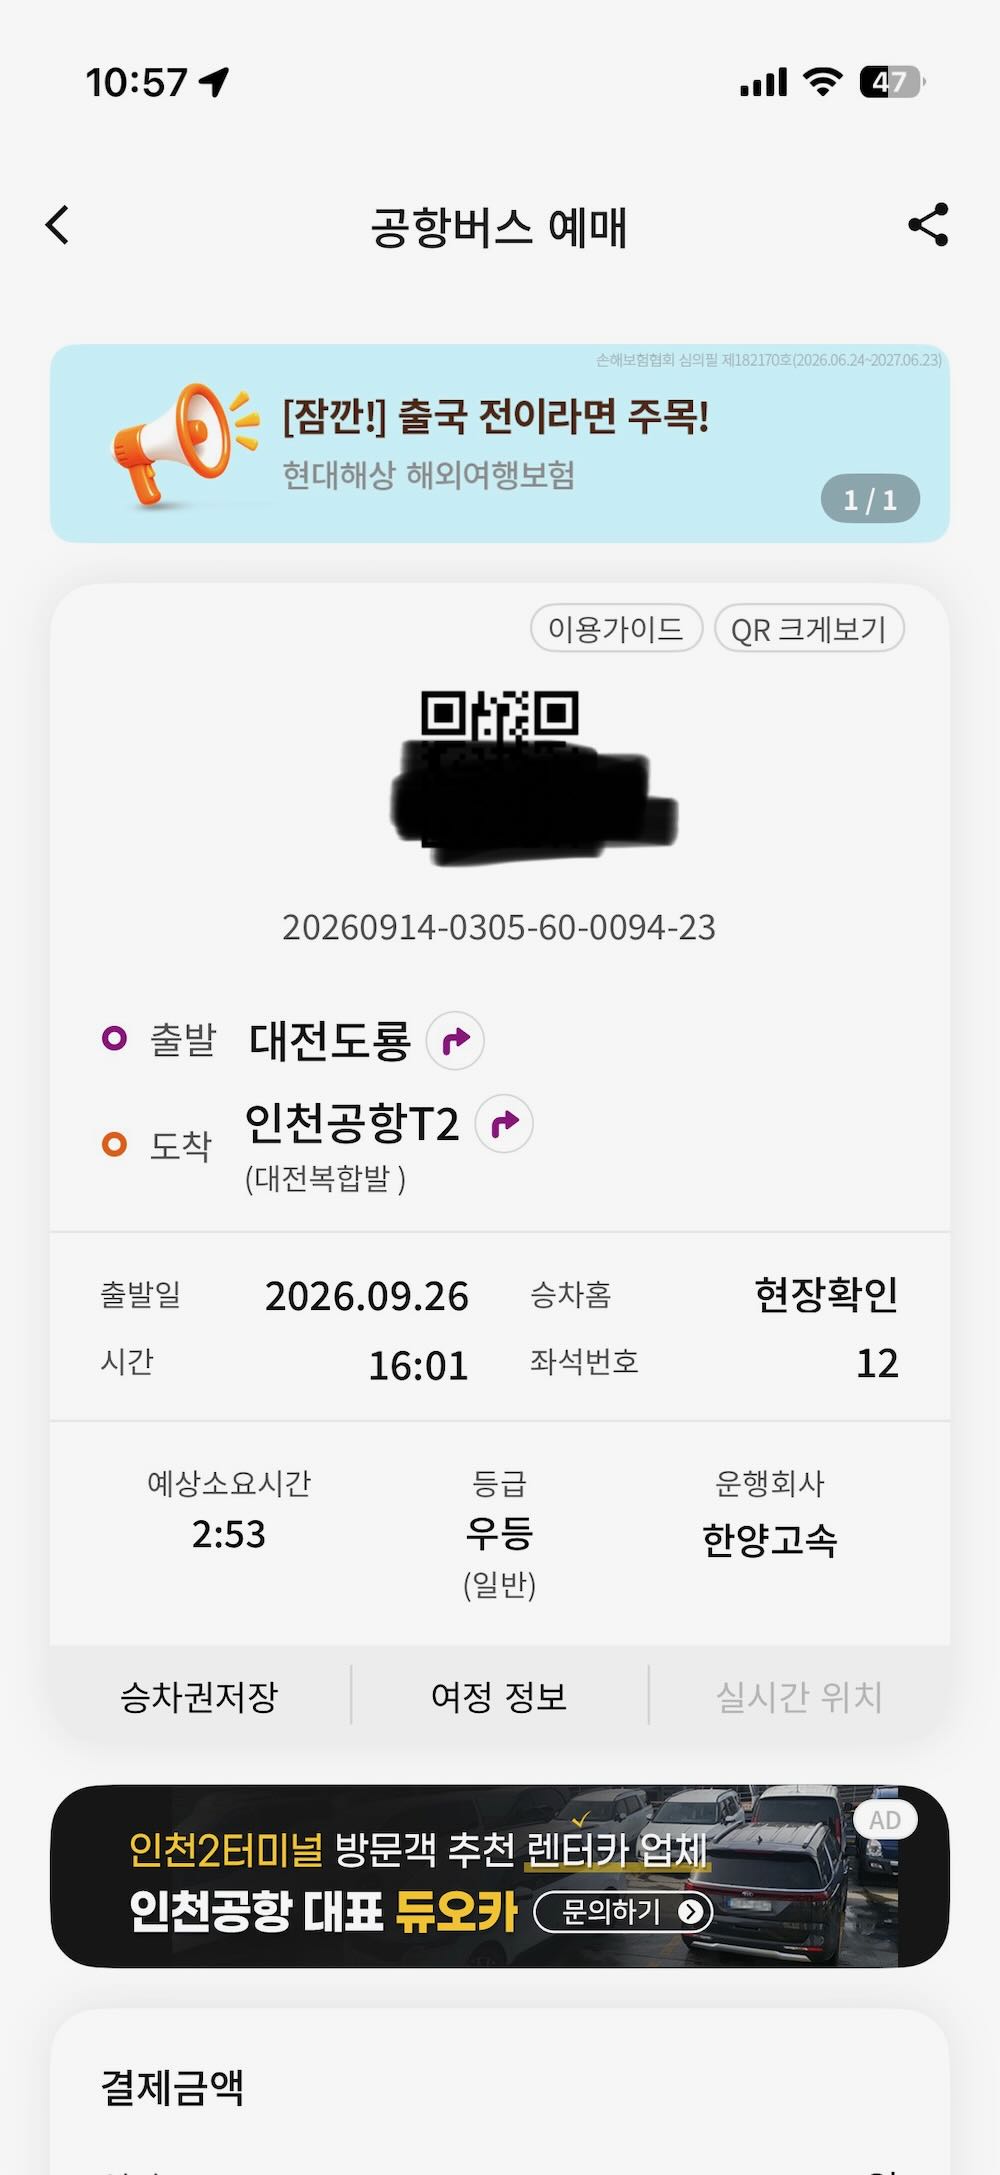
1Behind the pop-up is the ticket. The big QR code is what the driver’s reader scans; the number under it is your ticket number.
 123
123Reading the rest of it:
| Korean | Meaning |
|---|---|
| 출발 / 도착 | From / to. A name in brackets under 도착, such as (대전복합발), is where the bus started its run — not your stop. |
| 출발일 / 시간 | Departure date / time |
| 승차홈 | Boarding platform. 현장확인 means “check the signs when you get there” — common at small stops. |
| 좌석번호 | Your seat number |
| 예상소요시간 | Estimated journey time |
| 등급 | Class — 우등 (deluxe), 일반 (standard) |
| 운행회사 | The bus company, printed on the side of the bus |
| 승차권저장 | Save the ticket to your phone |
| 여정 정보 | Trip details |
| 실시간 위치 | Live bus location — greyed out until close to departure |
Tap 승차권저장 (or take a screenshot) before you leave for the bus stop. The stops near IBS have poor mobile reception, and a saved image works even when the app will not load.
Be at the stop 10 minutes early and check the sign on the front of the bus. Buses to Seoul and other cities use the same stops, and the buses leave exactly on the minute printed on your ticket.
Changing or cancelling a ticket
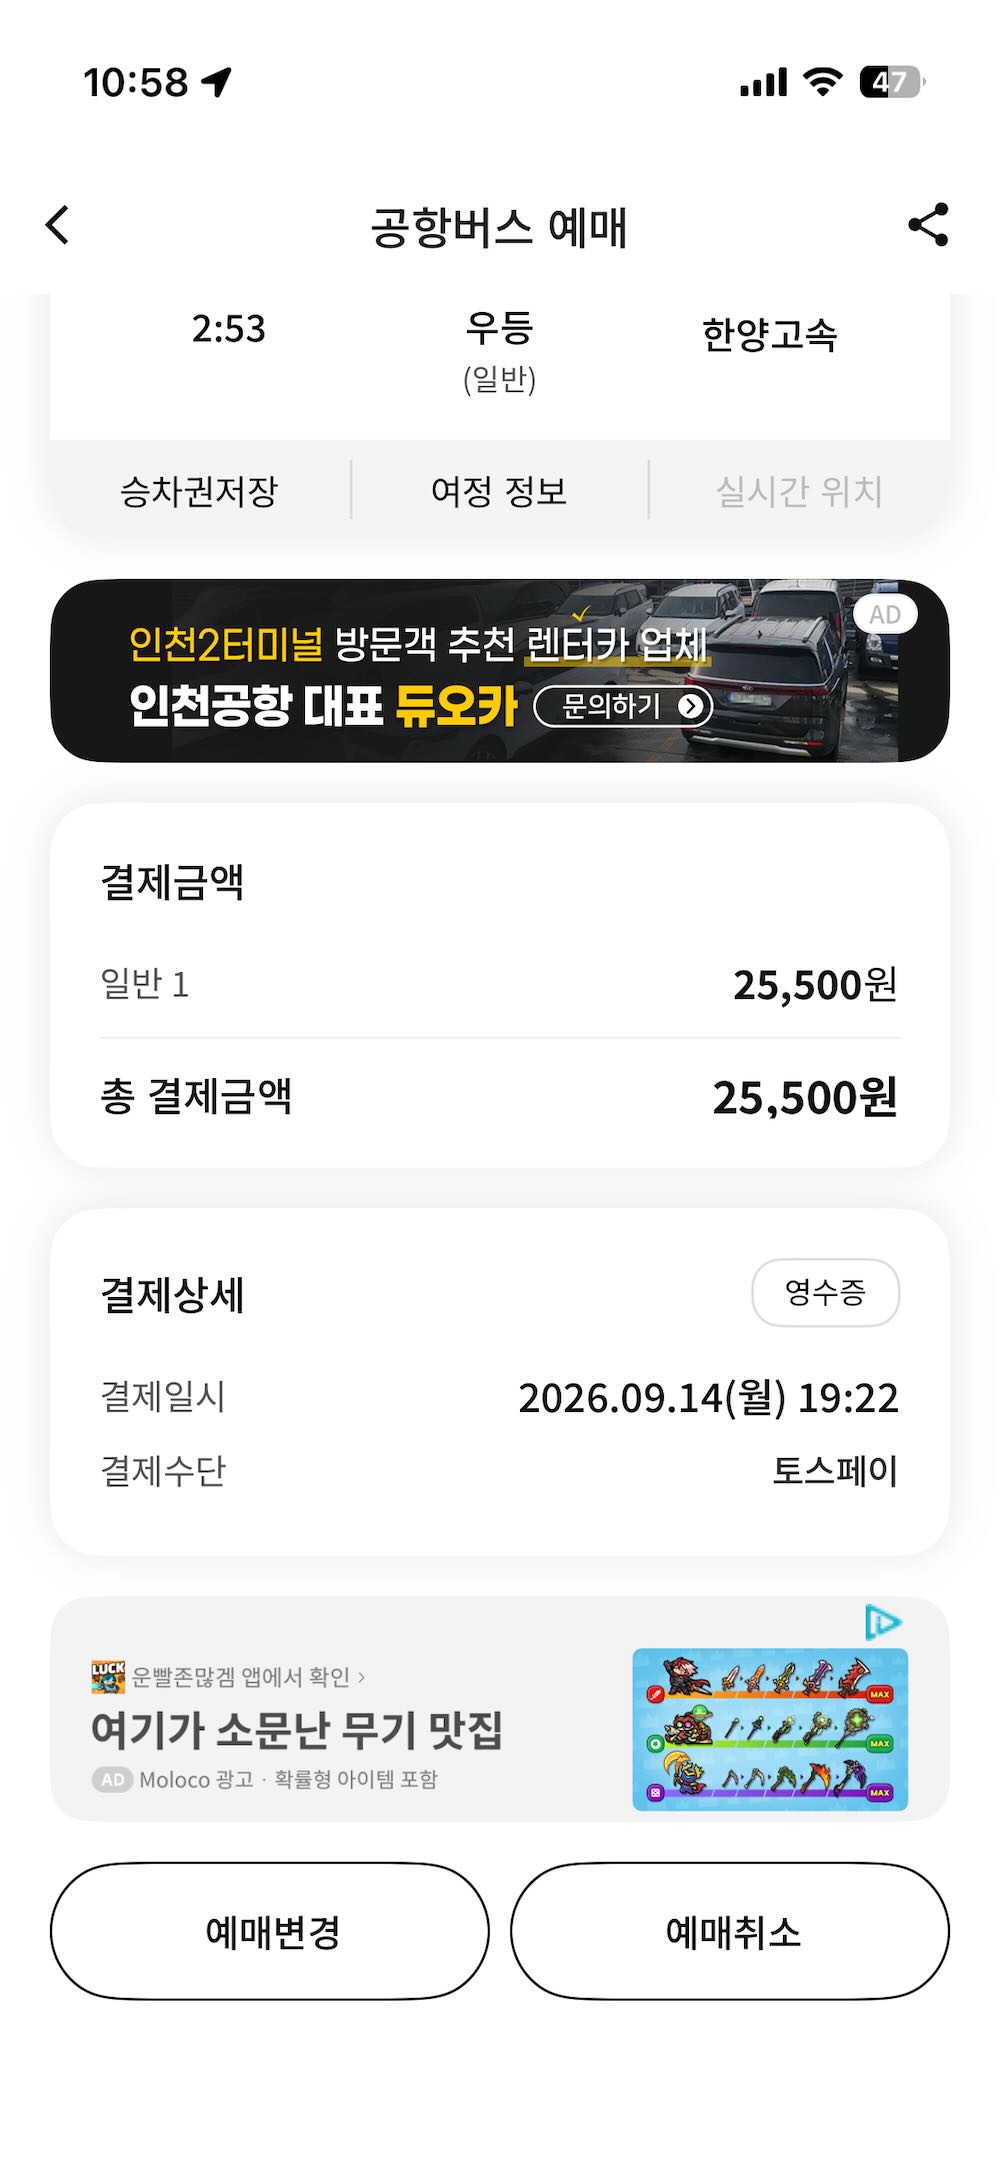
Open the ticket as above and scroll to the bottom. Below the fare and the payment details are two buttons: 예매변경 (change the booking) and 예매취소 (cancel it). 예매변경 reopens the search for the same route so you can move to another departure, subject to free seats; 예매취소 refunds the ticket, minus the fee in the table below. The app shows you the refund amount before you confirm, so you can always back out.
영수증, in the 결제상세 (payment details) box above, is your receipt — useful if you are claiming travel expenses.
 12
12You can only do this from the account that bought the ticket. If a colleague at IBS booked for you, ask them to make the change — it is not in your app.
Once the QR code has been scanned you can no longer cancel in the app; the guide pop-up says to ask the driver or the ticket window instead.
Cancellation fees
Intercity buses charge a cancellation fee that grows as departure approaches. This is the official schedule that took effect on 1 May 2025, as a percentage of the fare:
| When you cancel | Bus departs Mon–Thu | Bus departs Fri–Sun or a public holiday | Seollal / Chuseok period |
|---|---|---|---|
| 2 or more days before departure | 0% | 0% | 0% |
| 1 day to 3 hours before | 5% | 7.5% | 10% |
| Under 3 hours before, up to departure time | 10% | 15% | 20% |
| Up to 1 hour after departure | 40% | 40% | 40% |
| 1 to 4 hours after departure | 60% | 60% | 60% |
| More than 4 hours after departure | 100% — no refund | 100% | 100% |
There is also a grace period: cancelling within one hour of booking is free, as long as the bus has not yet left. Fees are rounded down to the nearest 100 won.
The 1-to-4-hours-after rate rises over time — it was 50% in 2025, is 60% through 30 April 2027, and becomes 70% after that. The fee is unchanged for the airport limousine operators (공항리무진, 도심공항리무진, K공항리무진, 서울공항리무진), which are excluded from this schedule.
Source: 시외버스 취소수수료 변경 안내, the official intercity bus reservation system. Flying out of Korea for good? Cancel as soon as your plans change — two days ahead it costs you nothing.
If something goes wrong
- The card will not register. It is almost certainly issued outside Korea, or not in your own name. Ask a colleague at IBS to book for you and send you the QR code — a ticket bought on someone else’s account is still valid for you.
- Everything is 매진 (sold out). Try the 유성복합 → 인천공항T1/T2 route instead. Yuseong is a different terminal with its own departures, so it often still has seats when Doryong is full. Go back to Step 3 and set 출발지 to 유성복합.
- You left the app mid-booking. The held seat is gone. Start again from Step 6; the seat is usually still free for a few minutes.